作为最好的虚拟机软件之一,VMware Workstation 是专为 Linux 和 Windows 系统设计的,为了照顾 Mac 平台的用户,VMware 原班人马又打造了 VMware Fusion,与 Workstation 体验基本一致。
现在 VMware Fusion 迎来了重大更新,可以直接使用 Docker 镜像启动容器,还可以构建镜像、推送镜像到镜像仓库,不需要安装 Docker Desktop。为了这个功能,VMware Fusion 专门创建了一个新的 CLI 工具:vctl,它包含在 VMware Fusion 中,安装好了之后就有这个命令了。
通过下面的链接下载安装最新版 VMware Fusion:
序列号什么的自己网上找一下就好了,我不方便提供。。
1. vctl 介绍#
vctl(代码名称:Nautilus 项目)是一个捆绑在 VMware Fusion 应用程序中的命令行实用程序,用于管理容器。大多数 vctl 命令选项可在 Fusion 和 Fusion Pro 中使用。但是,--publish 选项仅适用于 Fusion Pro。
相关的二进制文件/组件捆绑在 Fusion 应用程序中,可在 Applications/VMware Fusion.app/Contents/Library/vkd/ 文件夹中找到这些内容。主要包括以下三个二进制文件:
bin/containerd#
这是一个在后台运行的容器运行时守护进程。必须先启动 containerd 守护进程,然后才能运行任何与容器相关的操作。要启动该守护进程,请使用 vctl system start 命令,要停止该守护进程,请使用 vctl system stop 命令。
bin/containerd-shim-crx-v2#
启动新容器时,将启动一个新的 containerd-shim-crx-v2 进程,该进程将充当 CRX 虚拟机中的容器与 containerd 守护进程之间的适配器。
bin/vctl#
这是一个在前台运行的命令行实用程序,它可以将用户输入转发到 containerd 守护进程,和 containerd 进程进行交互,类似于 crictl 的功能。
CRX 虚拟机在容器启动时创建并启动。容器停止时,将关闭并移除该虚拟机。CRX 虚拟机的名称与容器的名称相同。2. 启动 Containerd#
在使用 vctl 操作容器之前,必须先启动 containerd 容器运行时。容器运行时不会在 VMware Fusion 应用程序启动时自动启动,也不会在 VMware Fusion 应用程序退出时自动停止,必须手动启动和停止。实际上也并不需要打开 VMware Fusion。
首先在终端中执行以下命令来检查容器运行时的状态:
$ vctl system info

Container runtime is stopped.
Use 'vctl system start' to start.
Container runtime path:       /Applications/VMware Fusion.app/Contents/Library/vkd/bin/containerd
Log file:                     not set
Log level:                    info
Config:                       not set
Virtual machine CPU (cores):  2
Virtual machine memory (MB):  1024
Host network:
DMG file:                     not set
Storage mount point:          <HOME>/.vctl/storage
然后启动容器运行时(需要输入管理员密码):
$ vctl system start

Preparing storage...
Container storage has been prepared successfully under <HOME>/.vctl/storage
Preparing container network, you may be prompted to input password for administrative operations...
Container network has been prepared successfully using vmnet: vmnet9
Launching container runtime...
Container runtime has been started.
列出网络设备:
$ vmrun listHostNetworks

Total host networks: 4
INDEX  NAME         TYPE         DHCP         SUBNET           MASK
0      vmnet0       bridged      false        empty            empty
1      vmnet1       hostOnly     true         192.168.22.0     255.255.255.0
8      vmnet8       nat          true         192.168.31.0     255.255.255.0
9      vmnet9       nat          true         192.168.134.0    255.255.255.0
3. vctl 使用#
启动容器运行时后,就可以操作容器和镜像了。先拉取一个镜像试试:
$ vctl pull nginx:alpine

INFO Pulling from index.docker.io/library/nginx:alpine
───                                                                                ──────   ────────
REF                                                                                STATUS   PROGRESS
───                                                                                ──────   ────────
index-sha256:b89a6ccbda39576ad23fd079978c967cecc6b170db6e7ff8a769bf2259a71912      Done     100% (1645/1645)
manifest-sha256:ee5a9b68e8d4a4b8b48318ff08ad5489bd1ce52b357bf48c511968a302bc347b   Done     100% (1360/1360)
layer-sha256:c4a057508f96954546441044f0d2373303862a4d4accc163e68a4c30d0c88869      Done     100% (668/668)
config-sha256:7d0cdcc60a96a5124763fddf5d534d058ad7d0d8d4c3b8be2aefedf4267d0270     Done     100% (8026/8026)
layer-sha256:cbdbe7a5bc2a134ca8ec91be58565ec07d037386d1f1d8385412d224deafca08      Done     100% (2813316/2813316)
layer-sha256:10c113fb0c778963cb3069e94e8148a3770122f6763c94373e22f5342b503ab0      Done     100% (6460970/6460970)
layer-sha256:9ba64393807bf2549af97a1a074ca5fff1bce25ad115b0a7ced446cd1b4305d0      Done     100% (538/538)
layer-sha256:262f9908119d4529a370bcdf1f1306131ad556edf400413d5fa74008d7919931      Done     100% (899/899)
INFO Unpacking nginx:alpine...
INFO done

$ vctl images

────           ─────────────               ────
NAME           CREATION TIME               SIZE
────           ─────────────               ────
nginx:alpine   2020-06-08T17:05:15+08:00   8.9 MiB
是不是有种熟悉的味道?跑一个容器试试:
$ vctl run -d --name mynginx nginx:alpine
INFO container mynginx started and detached from current session

$ vctl ps
────      ─────          ───────                   ──                ─────   ──────    ─────────────
NAME      IMAGE          COMMAND                   IP                PORTS   STATUS    CREATION TIME
────      ─────          ───────                   ──                ─────   ──────    ─────────────
mynginx   nginx:alpine   /docker-entrypoint.s...   192.168.134.129   n/a     running   2020-06-08T17:16:11+08:00
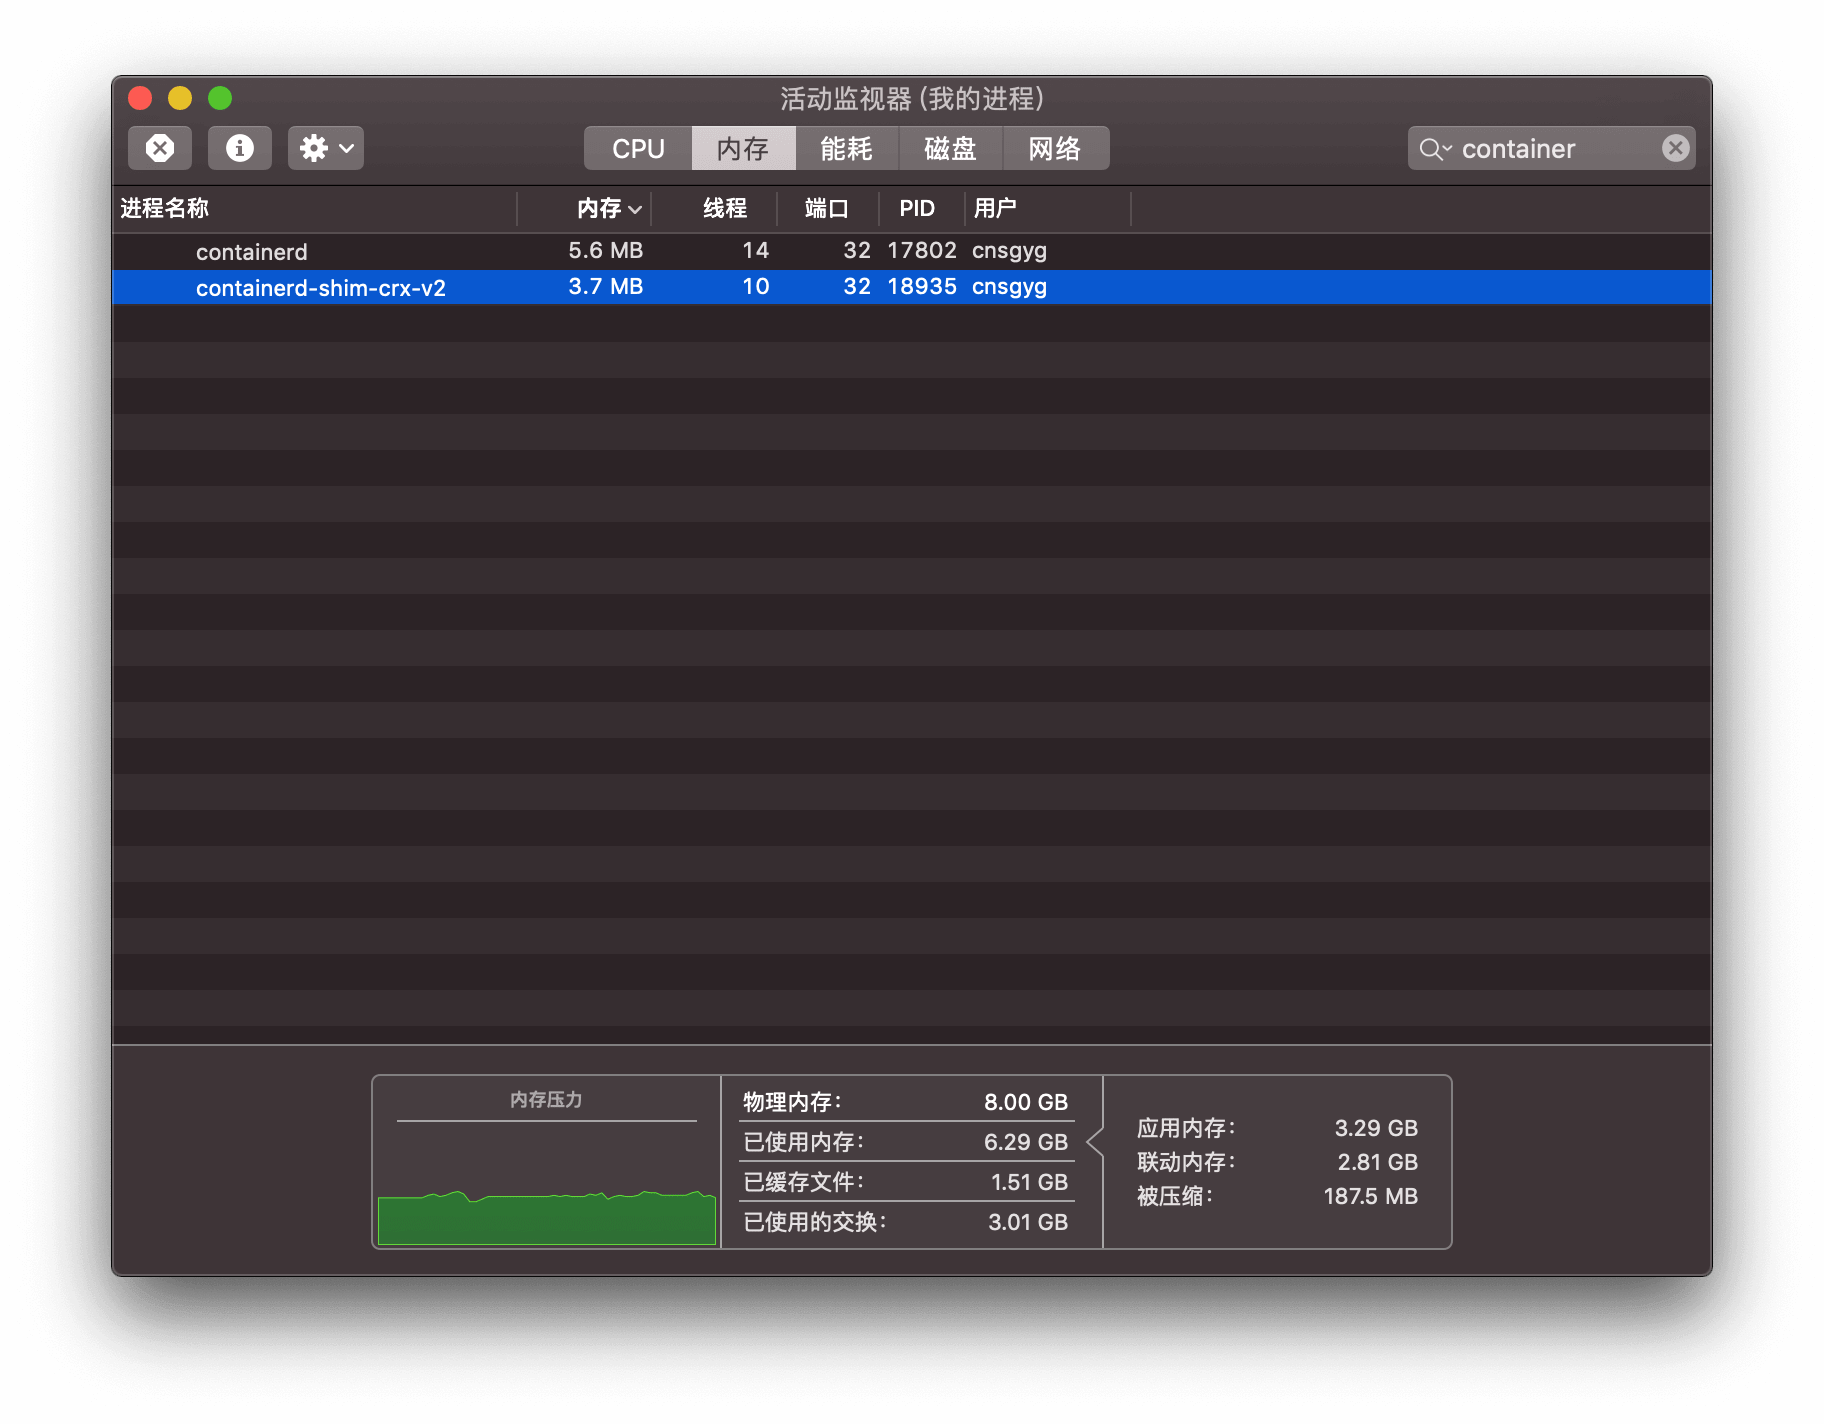
可以看到其资源占用非常低:
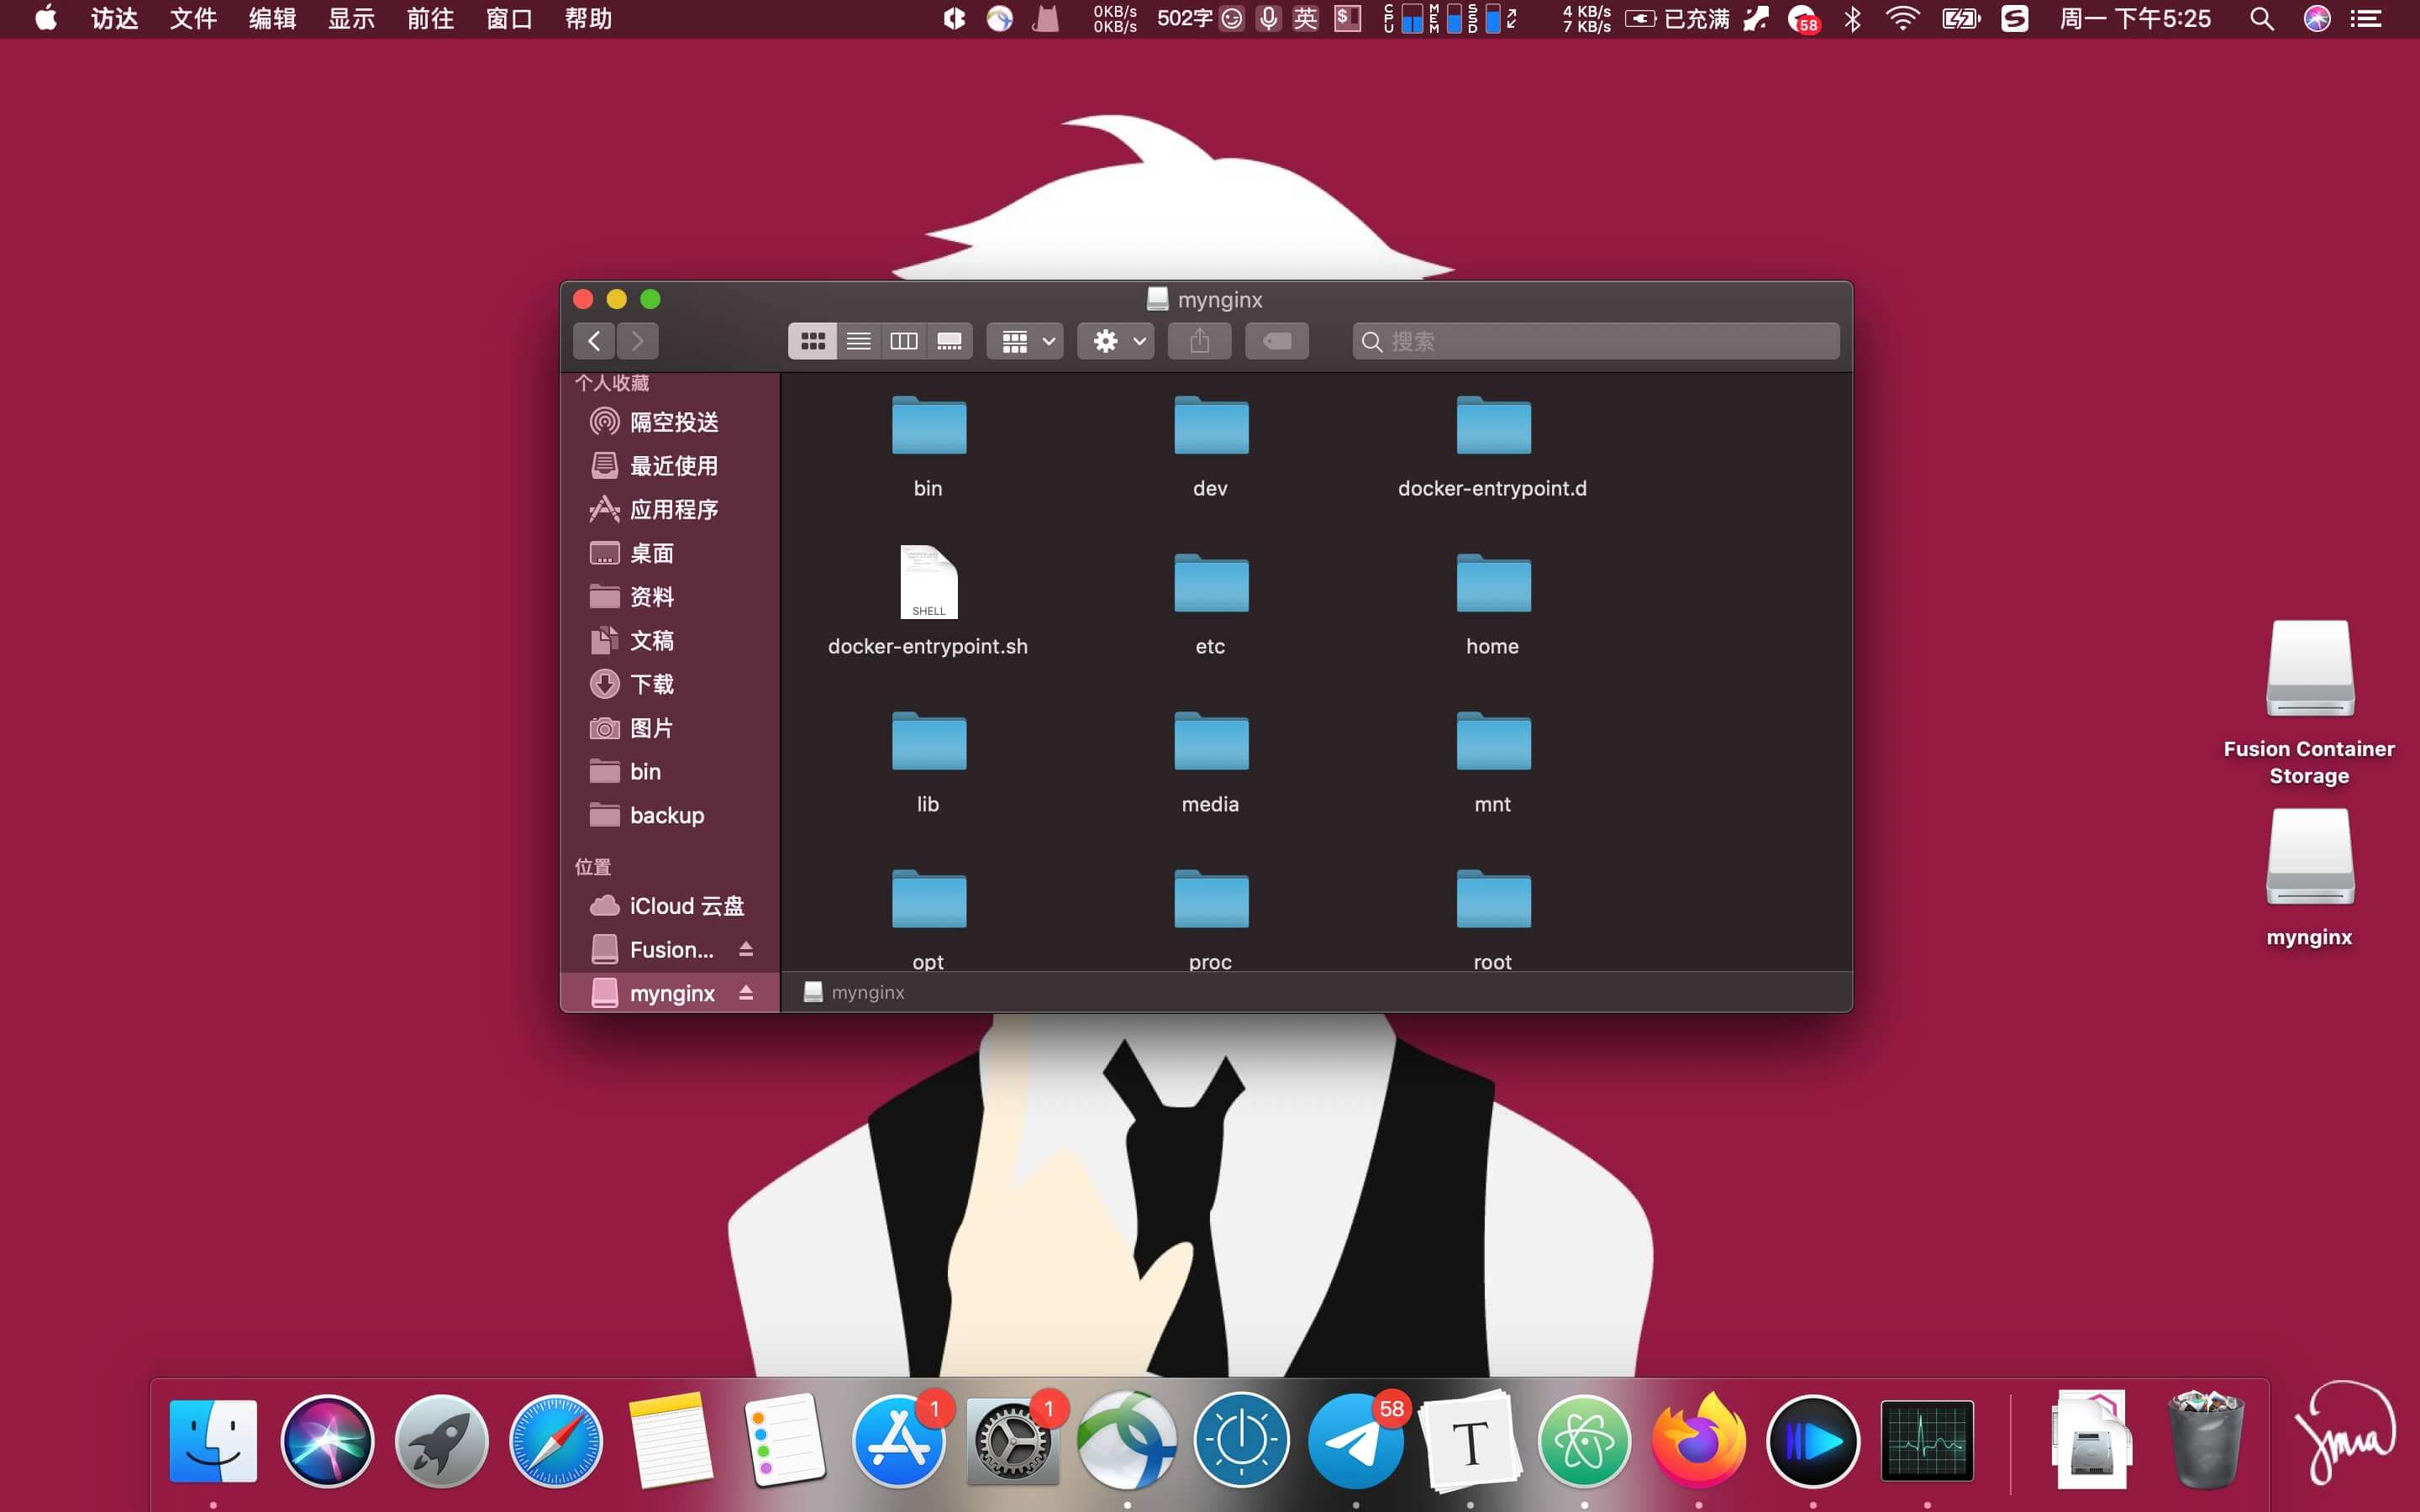
这一步神奇的事情就发生了!当容器被启动时,它的 rootfs 会被挂载到宿主机上,这就意味着我们可以直接使用 Finder 来浏览容器里的内容,并实时修改,就像在宿主机里编辑文件一样,简直太爽了!
查看容器详细信息:
$ vctl describe mynginx

Name:                       mynginx
Status:                     running
Command:                    /docker-entrypoint.sh nginx -g daemon off;
Container rootfs in host:   <HOME>/.vctl/storage/containerd/state/io.containerd.runtime.v2.task/vctl/mynginx/rootfs
IP address:                 192.168.134.129
Creation time:              2020-06-08T17:16:11+08:00
Image name:                 nginx:alpine
Image size:                 8.9 MiB
Host virtual machine:       <HOME>/.vctl/.r/vms/mynginx/mynginx.vmx
Container rootfs in VM:     /.containers/mynginx
Access in host VM:          vctl execvm --sh -c mynginx
Exec in host VM:            vctl execvm -c mynginx /bin/ls
进入容器:
$ vctl exec -it mynginx sh
/ # ip a
1: lo: <LOOPBACK,UP,LOWER_UP> mtu 65536 qdisc noqueue state UNKNOWN qlen 1000
    link/loopback 00:00:00:00:00:00 brd 00:00:00:00:00:00
    inet 127.0.0.1/8 scope host lo
       valid_lft forever preferred_lft forever
    inet6 ::1/128 scope host
       valid_lft forever preferred_lft forever
2: eth0: <BROADCAST,MULTICAST,UP,LOWER_UP> mtu 1500 qdisc mq state UP qlen 1000
    link/ether 00:0c:29:8c:90:ad brd ff:ff:ff:ff:ff:ff
    inet 192.168.134.129/24 brd 192.168.134.255 scope global eth0
       valid_lft forever preferred_lft forever
    inet6 fe80::20c:29ff:fe8c:90ad/64 scope link
       valid_lft forever preferred_lft forever
3: dummy0: <BROADCAST,NOARP> mtu 1500 qdisc noop state DOWN qlen 1000
    link/ether 12:50:93:b9:b0:b9 brd ff:ff:ff:ff:ff:ff
进入虚拟机:
$ vctl execvm --sh -c mynginx
sh-4.4# uname -a
Linux  4.19.84-1.ph3-esx #1-photon SMP Tue Nov 19 00:39:50 UTC 2019 x86_64
sh-4.4# uname -r
4.19.84-1.ph3-esx
sh-4.4# ifconfig
lo        Link encap:Local Loopback
          inet addr:127.0.0.1  Mask:255.0.0.0
          inet6 addr: ::1/128 Scope: Host
          UP LOOPBACK RUNNING  MTU:65536  Metric:1
          RX packets:6 errors:0 dropped:0 overruns:0 frame:0
          TX packets:6 errors:0 dropped:0 overruns:0 carrier:0
          collisions:0 txqueuelen:1000
          RX bytes:751 TX bytes:751

eth0      Link encap:Ethernet  HWaddr 00:0c:29:8c:90:ad  Driver vmxnet3
          inet addr:192.168.134.129  Bcast:192.168.134.255  Mask:255.255.255.0
          inet6 addr: fe80::20c:29ff:fe8c:90ad/64 Scope: Link
          UP BROADCAST RUNNING MULTICAST  MTU:1500  Metric:1
          RX packets:3 errors:0 dropped:0 overruns:0 frame:0
          TX packets:26 errors:0 dropped:0 overruns:0 carrier:0
          collisions:0 txqueuelen:1000
          RX bytes:194 TX bytes:1572
不得不说,VMware 真是越来越会玩了,不断地自我革命,其中 VMware Tanzu 就是为拥抱 Kubernetes 而进行的自我革命,它将 Kubernetes 控制平面直接集成到 ESXi 和 vCenter 中,使其成为 ESXi 的控制平面,并通过 vCenter 提供以应用为中心的管理功能。现在连家用的 Fusion 也推出了容器管理的功能,可以想象,未来软件世界将会被容器所吞噬。


