


之前我给大家介绍过如何
在 macOS 上使用 multipass 创建轻量级虚拟机来使用 Podman,众小伙伴纷纷齐说真香。今天我要给大家介绍一个全新的黑科技,利用 macOS Big Sur 引入的全新虚拟化框架
Virtualization Kit 来创建更加轻量级的虚拟机。准确地说,这个最新的虚拟化框架并不能直接使用,它只是提供了 API,为许多设备类型定义了标准接口,包括网络、存储等设备,且支持 Virtio 标准。要想使用该框架来创建管理虚拟机,需要对其进行封装,构建出一个易于使用的工具,目前最优秀的就是
vftool。
下面就来看看如何使用 vftool 来创建 Ubuntu 虚拟机。
1. 编译 vftool#
vftool 使用的是 Swift 语言,要想成功编译出可执行文件,需要安装 Xcode 命令行工具,你可以通过下面的命令直接安装:
$ xcode-select --install
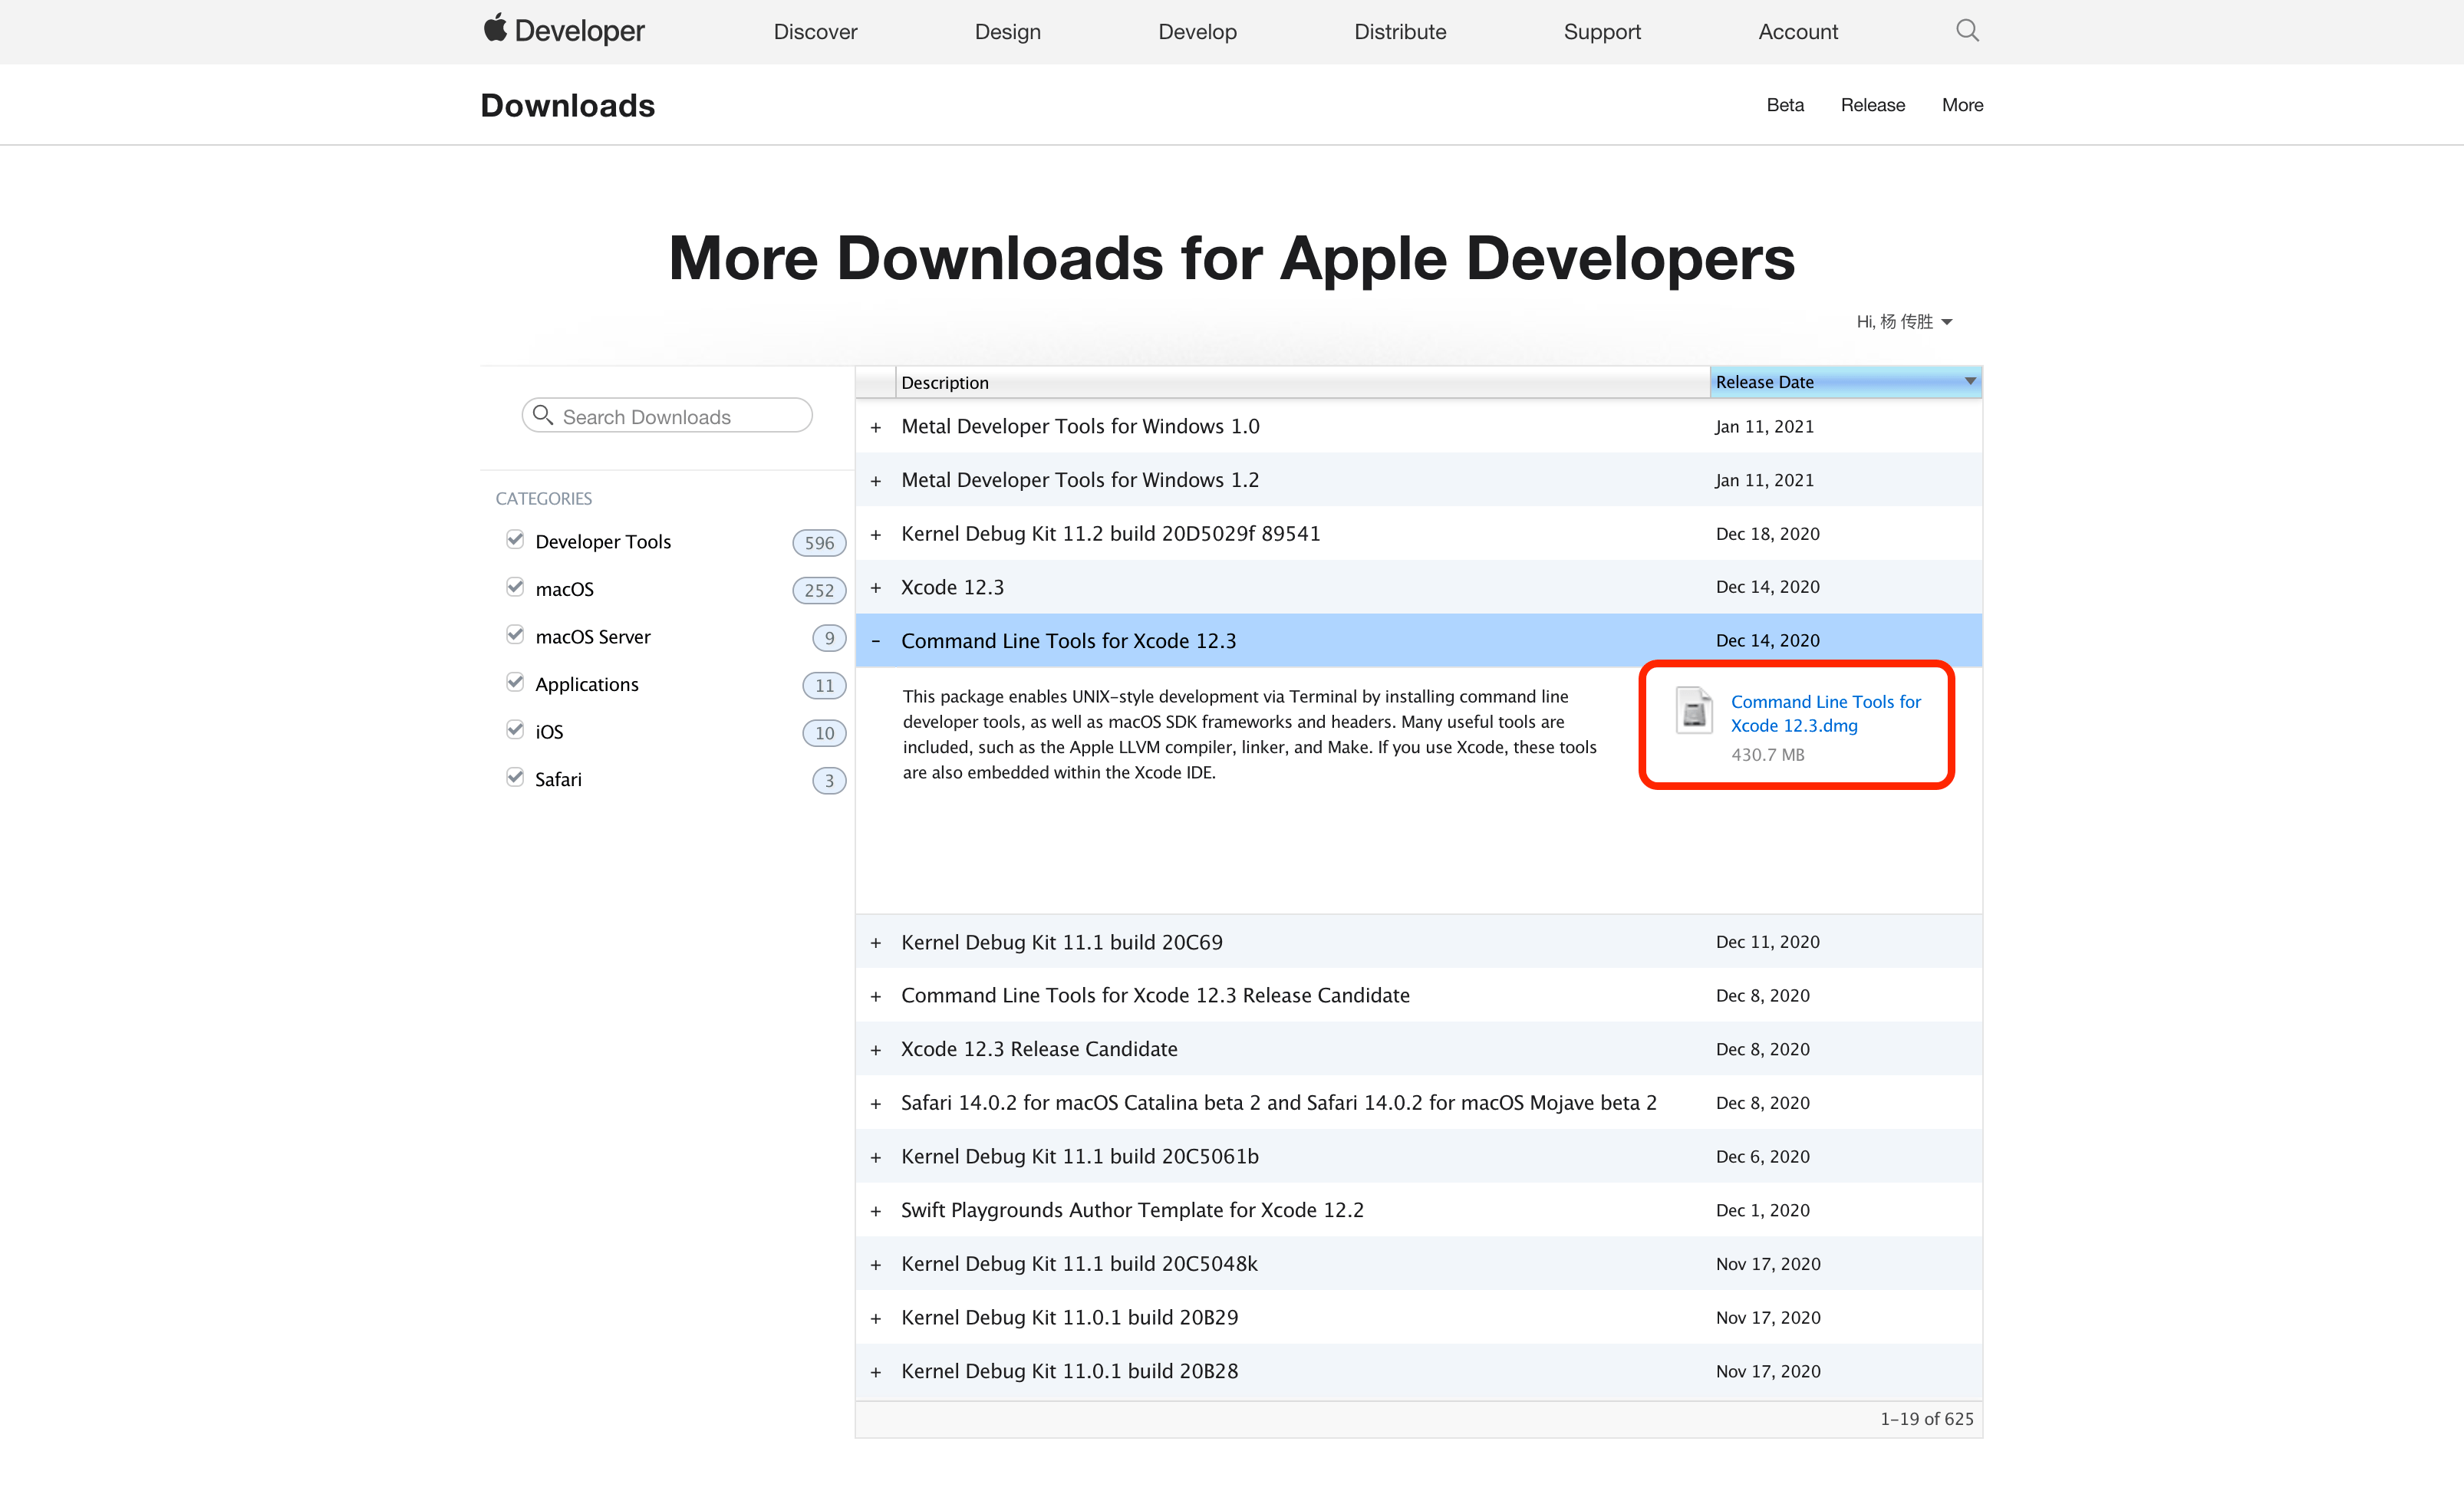
或者到官方网站下载安装: https://developer.apple.com/download/more/
或者你也可以直接安装 Xcode。
安装好 Xcode 命令行工具后,就可以拉取 vftool 仓库进行编译了:
$ git clone https://github.com/evansm7/vftool.git
$ clang -framework Foundation -framework Virtualization vftool/vftool/main.m -o /usr/local/bin/vftool
后面创建虚拟机的时候,你可能会遇到以下的报错:
Configuration vaildation failure! Error Domain=VZErrorDomain Code=2 “Virtualization requires the “com.apple.security.virtualization” entitlement” UserInfo={NSDebugDescription=Virtualization requires the “com.apple.security.virtualization” entitlement}
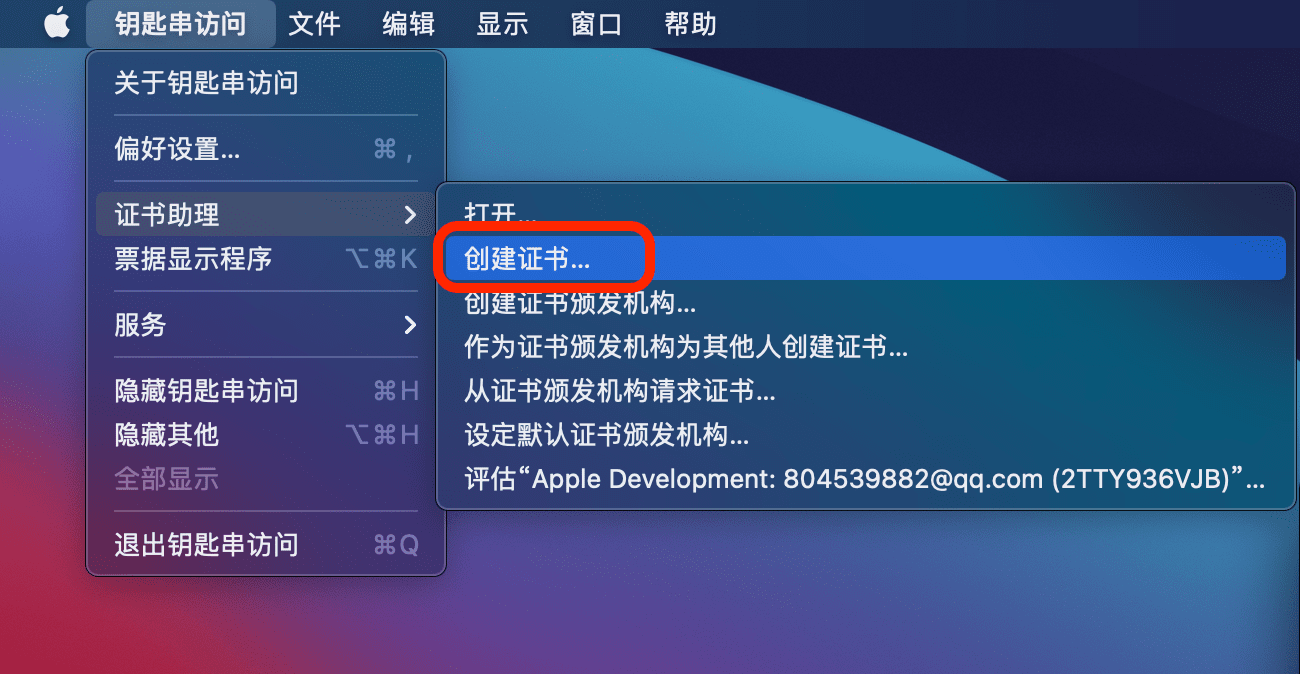
这是因为编译完成后需要对二进制文件进行签名,而签名是需要授权的,所以需要创建一个自签名证书。打开钥匙串访问,依次选择 证书助理 –> 创建证书:
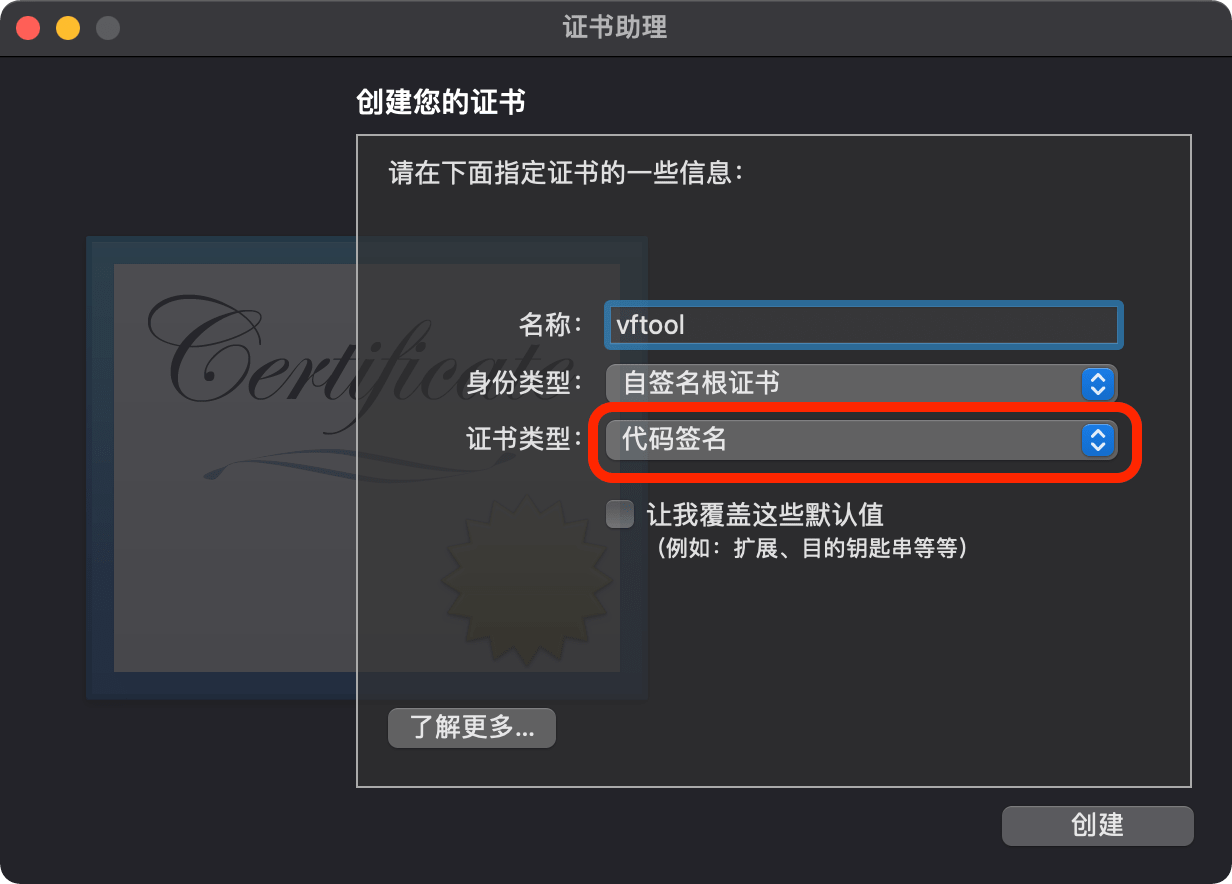
选择证书类型为 代码签名,名字随便写,然后点击创建:
然后利用新建的自签名证书对二进制文件进行签名:
$ codesign --entitlements vftool/vftool/vftool.entitlements -s "<NAME ON CERTIFICATE>" /usr/local/bin/vftool
除了上面的方法之外,还有一种编译方法,直接运行以下命令:
$ xcodebuild
$ cp build/Release/vftool /usr/local/bin/vftool
现在就可以使用这个二进制文件来创建虚拟机了。
2. 准备镜像文件#
需要准备三个文件:
- kernel: https://cloud-images.ubuntu.com/releases/focal/release/unpacked/ubuntu-20.04-server-cloudimg-amd64-vmlinuz-generic
- initrd: https://cloud-images.ubuntu.com/releases/focal/release/unpacked/ubuntu-20.04-server-cloudimg-amd64-initrd-generic
- disk image: https://cloud-images.ubuntu.com/releases/focal/release/ubuntu-20.04-server-cloudimg-amd64.tar.gz
下载相关文件:
$  mkdir -p ~/bin/vm
$ cd ~/bin/vm
$ wget https://cloud-images.ubuntu.com/releases/focal/release/unpacked/ubuntu-20.04-server-cloudimg-amd64-vmlinuz-generic
$ wget https://cloud-images.ubuntu.com/releases/focal/release/unpacked/ubuntu-20.04-server-cloudimg-amd64-initrd-generic
$ wget https://cloud-images.ubuntu.com/releases/focal/release/ubuntu-20.04-server-cloudimg-amd64.tar.gz
$ mv ubuntu-20.04-server-cloudimg-amd64-vmlinuz-generic vmlinux
$ mv ubuntu-20.04-server-cloudimg-amd64-initrd-generic initrd
$ tar xvfz ubuntu-20.04-server-cloudimg-amd64.tar.gz
创建数据盘:
$ dd if=/dev/zero of=data.img bs=1m count=51200
3. 修改虚拟机网段#
如果你想自定义虚拟机的网段,可以直接修改文件 /Library/Preferences/SystemConfiguration/com.apple.vmnet.plist。例如修改为:
        <key>Shared_Net_Address</key>
        <string>192.168.64.1</string>
        <key>Shared_Net_Mask</key>
        <string>255.255.255.0</string>
3. 创建虚拟机#
直接通过 vftool 创建虚拟机:
$ vftool \
  -k vmlinux \
  -i initrd \
  -c focal-server-cloudimg-amd64.img \
  -d data.img \
  -m 2048 \
  -a "console=hvc0"

2021-01-14 13:27:08.223 vftool[66147:839169] vftool (v0.3 10/12/2020) starting
2021-01-14 13:27:08.223 vftool[66147:839169] +++ kernel at vmlinux, initrd at initrd, cmdline 'console=hvc0', 1 cpus, 2048MB memory
2021-01-14 13:27:08.224 vftool[66147:839169] +++ fd 3 connected to /dev/ttys000
2021-01-14 13:27:08.224 vftool[66147:839169] +++ Waiting for connection to:  /dev/ttys000
从日志信息可以看到该虚拟机连接的 TTY,我这里是 /dev/ttys000。打开一个新的终端窗口,连接该 TTY,然后执行一系列命令来进行初始化操作:
$ screen /dev/ttys000
<LOTS OF OUTPUT>
(initramfs) dd if=/dev/vda of=/dev/vdb bs=1024k &
(initramfs) mkdir /mnt
(initramfs) mount /dev/vdb /mnt
(initramfs) chroot /mnt

root@(none):/# touch /etc/cloud/cloud-init.disabled
root@(none):/# echo 'root:root' | chpasswd
root@(none):/# echo "podman" >/etc/hostname
root@(none):/# ssh-keygen -f /etc/ssh/ssh_host_rsa_key -N '' -t rsa
root@(none):/# ssh-keygen -f /etc/ssh/ssh_host_dsa_key -N '' -t dsa
root@(none):/# ssh-keygen -f /etc/ssh/ssh_host_ed25519_key -N '' -t ed25519
root@(none):/# cat <<EOF > /etc/netplan/01-dhcp.yaml
network:
    renderer: networkd
    ethernets:
        enp0s1:
            dhcp4: no
            addresses: [192.168.64.2/24]
            gateway4: 192.168.64.1
            nameservers:
                addresses: [114.114.114.114]
    version: 2
EOF

root@(none):/# echo "PermitRootLogin yes" >> /etc/ssh/sshd_config
root@(none):/# sed -i "/^PasswordAuthentication/ c PasswordAuthentication yes" /etc/ssh/sshd_config

root@(none):/# exit
(initramfs) umount /dev/vda
上面的步骤总共干了这么几件事:
- 挂载硬盘
- 禁用 cloud-init
- 设置主机名和 ssh 秘钥
- 设置网络
- 设置 ssh 允许使用 root 用户和密码登录
然后在运行 vftool 命令的窗口中按 CTRL-C 来关闭虚拟机。
接着使用新的硬盘来启动虚拟机:
$ vftool \
  -k vmlinux \
  -i initrd \
  -d data.img \
  -m 2048 \
  -a "console=hvc0 root=/dev/vda" \
  -t 0
打开一个新的终端窗口,通过 ssh 连接虚拟机,调整硬盘容量,移除不必要的组件:
$ ssh root@192.168.64.2
# login as root
root@podman:~# systemctl disable --now snapd.service snapd.socket
root@podman:~# resize2fs /dev/vda
root@podman:~# apt remove -y cloud-init cloud-initramfs-copymods cloud-initramfs-dyn-netconf cloud-guest-utils popularity-contest
看看它的内存占用:
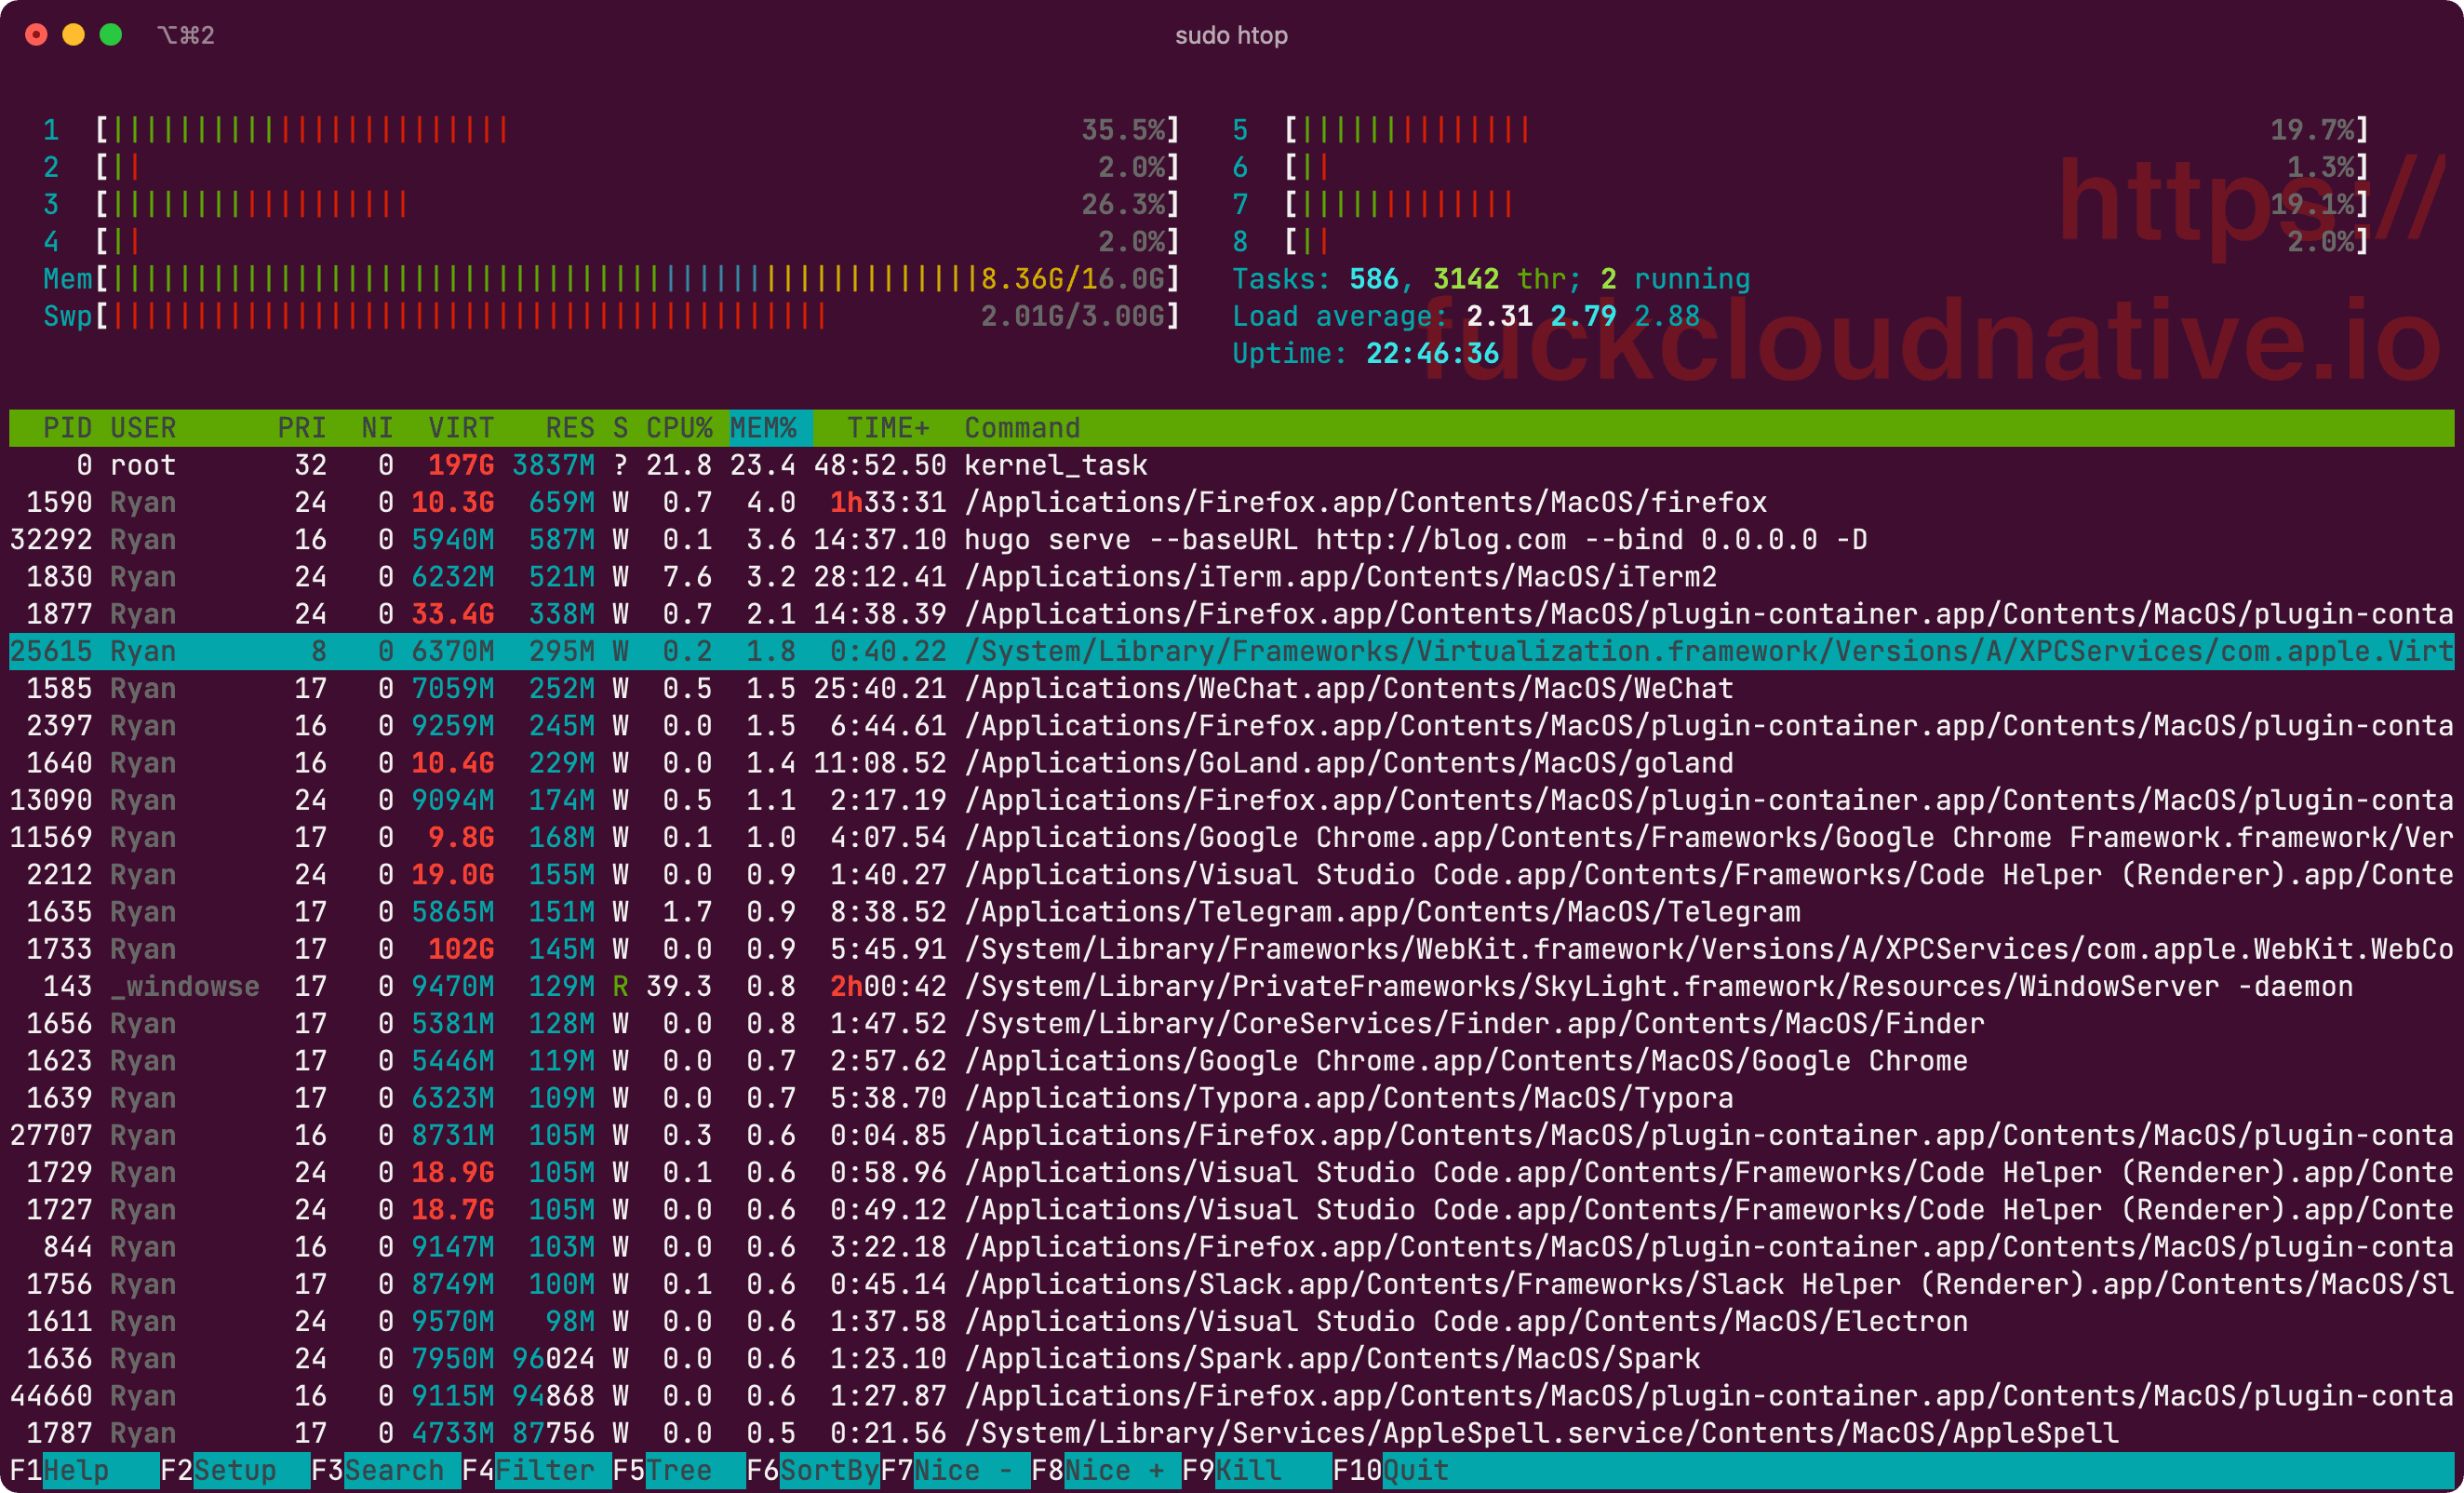
果然很香!
4. 开机自启#
MacOS 可以使用 launchctl 来管理服务,它可以控制启动计算机时需要开启的服务,也可以设置定时执行特定任务的脚本,就像 Linux crontab 一样, 通过加装 *.plist 文件执行相应命令。Launchd 脚本存储在以下位置, 默认需要自己创建个人的 LaunchAgents 目录:
~/Library/LaunchAgents: 由用户自己定义的任务项/Library/LaunchAgents: 由管理员为用户定义的任务项/Library/LaunchDaemons: 由管理员定义的守护进程任务项/System/Library/LaunchAgents: 由 MacOS 为用户定义的任务项/System/Library/LaunchDaemons: 由 MacOS 定义的守护进程任务项
我们选择在 ~/Library/LaunchAgents/ 目录下创建 vftool.ubuntu.plist 文件,内容如下:
<?xml version="1.0" encoding="UTF-8"?>
<!DOCTYPE plist PUBLIC "-//Apple Computer//DTD PLIST 1.0//EN" "http://www.apple.com/DTDs/PropertyList-1.0.dtd">
<plist version="1.0">
  <dict>
    <key>Label</key>
    <string>ubuntu</string>
    <key>ProgramArguments</key>
    <array>
      <string>/bin/bash</string>
      <string>-c</string>
      <string>$HOME/bin/vm/start.sh</string>
    </array>
    <key>StandardOutPath</key>
    <string>/var/log/vftool.ubuntu.stdout.log</string>
    <key>StandardErrorPath</key>
    <string>/var/log/vftool.ubuntu.stderr.log</string>
    <key>KeepAlive</key>
    <true/>
    <key>RunAtLoad</key>
    <true/>
  </dict>
</plist>
创建启动脚本:
$ cd ~/bin/vm
$ cat <<EOF > start.sh
#!/bin/bash

/usr/local/bin/vftool \
  -k $HOME/bin/vm/vmlinux \
  -i $HOME/bin/vm/initrd \
  -d $HOME/bin/vm/data.img \
  -m 2048 \
  -a "console=hvc0 root=/dev/vda" \
  -t 0
EOF
$ chmod +x start.sh
创建日志文件:
$ touch /var/log/vftool.ubuntu.stdout.log
$ touch /var/log/vftool.ubuntu.stderr.log
$ sudo chmod a+rw /var/log/vftool.ubuntu.stdout.log
$ sudo chmod a+rw /var/log/vftool.ubuntu.stderr.log
设置开机自动启动 Ubuntu 虚拟机:
$ launchctl load -w ~/Library/LaunchAgents/vftool.ubuntu.plist
启动服务:
$ launchctl start ubuntu
查看服务:
$ launchctl list ubuntu
{
	"StandardOutPath" = "/var/log/vftool.ubuntu.stdout.log";
	"LimitLoadToSessionType" = "Aqua";
	"StandardErrorPath" = "/var/log/vftool.ubuntu.stderr.log";
	"Label" = "ubuntu";
	"OnDemand" = false;
	"LastExitStatus" = 256;
	"PID" = 50797;
	"Program" = "/bin/bash";
	"ProgramArguments" = (
		"/bin/bash";
		"-c";
		"$HOME/bin/vm/start.sh";
	);
};
大功告成,现在就可以通过 ssh 连接虚拟机了:
$ ssh root@192.168.64.2
5. 共享文件系统#
虚拟机访问宿主机#
虚拟机在许多场景中需要访问宿主机的文件系统,vftool 目前还没有太好的办法,只能通过 Mac 的文件共享功能来访问。
首先进入系统偏好设置中的共享选项。勾中文件共享(如下图),之后右边的文件共享的绿灯会点亮,并显示“文件共享:打开”。
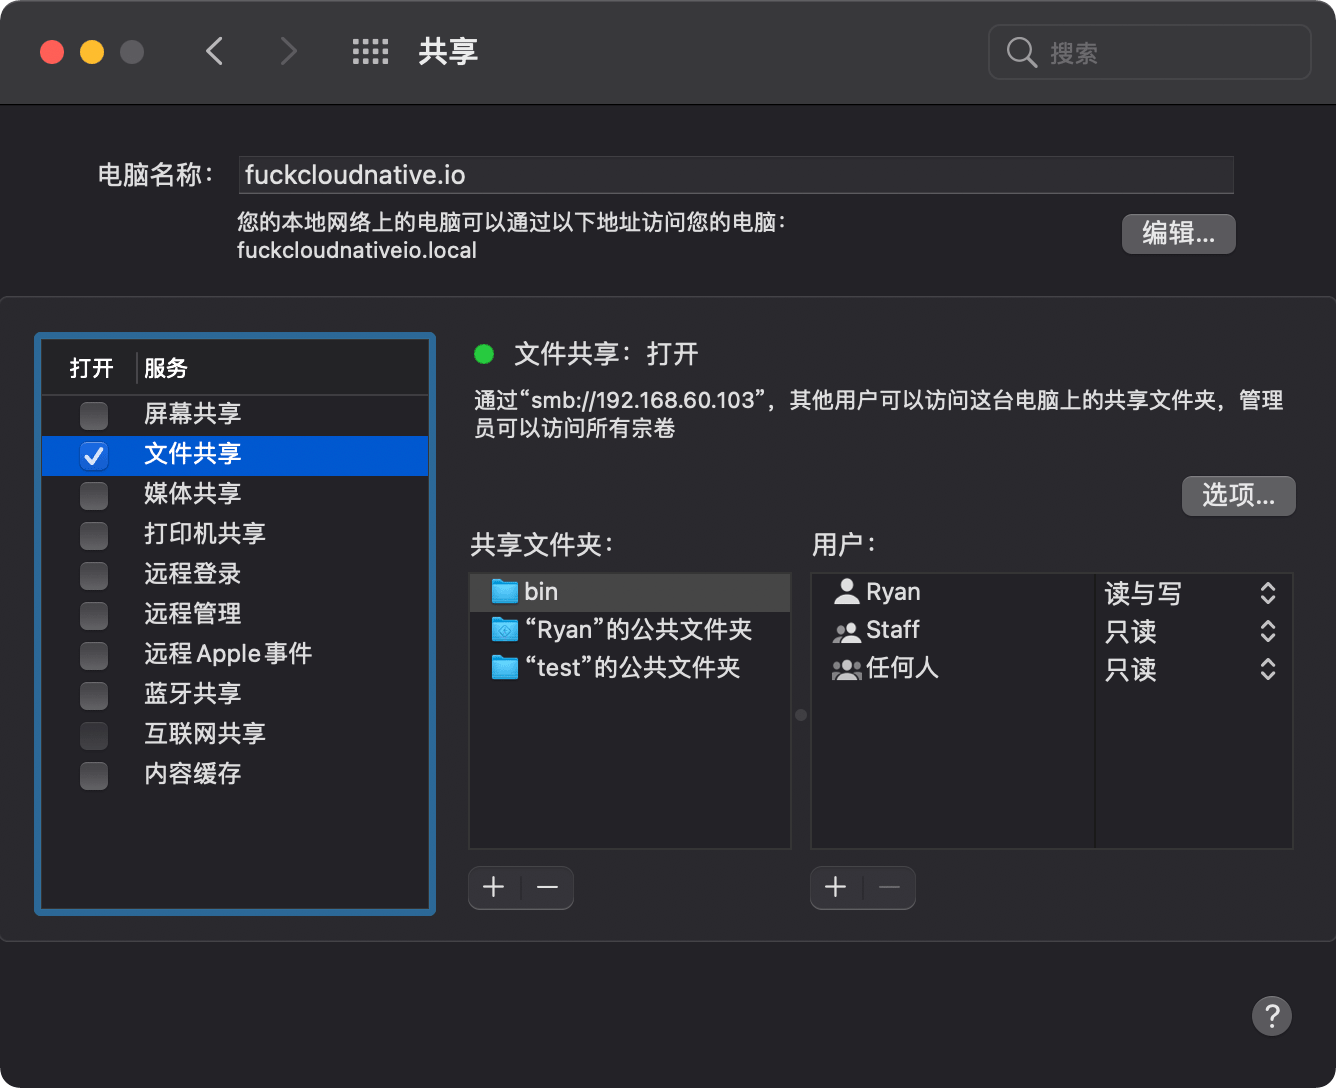
点击在文件共享界面中右边的共享文件夹下的+号,在出现的窗口中找到你要共享的目录,点击增加。之后在右边的用户里,进行对该目录的访问权限设置。
然后 ssh 登录虚拟机,安装 samaba 客户端:
$ ssh root@192.168.64.2
root@podman:~# apt update
root@podman:~# apt install -y cifs-utils
挂载宿主机的文件系统:
$ mount -t cifs //192.168.64.1/bin /mnt -o username=<USERNAME>,password=<PASSWORD>,nounix,sec=ntlmssp
你也可以写进 /etc/fstab 中,开机自动挂载:
//192.168.64.1/bin /mnt/bin cifs username=Ryan,password=yang8683060,nounix,sec=ntlmssp 0 0
宿主机访问虚拟机#
如果宿主机想访问虚拟机的文件系统怎么办呢?
虚拟机的硬盘其实就是 data.img,文件系统是 ext4,我们可以使用 hdiutil 将 data.img 转换为块设备:
$ sudo hdiutil attach -nomount data.img
/dev/disk2
然后再安装支持 ext4 格式的挂载工具:
$ brew install --cask osxfuse
$ brew install ext4fuse
最后再手动挂载:
$ sudo ext4fuse /dev/disk2 ~/tmp/ubuntu -o allow_other
挂载点可以根据你自己的喜好设置,我这里设置的是 ~/tmp/ubuntu。
挂载完成后,就可以在宿主机直接访问虚拟机的文件系统了:
$ tree -L 1 ~/tmp/ubuntu
/Users/Ryan/tmp/ubuntu
├── bin -> usr/bin
├── boot
├── dev
├── etc
├── home
├── lib -> usr/lib
├── lib32 -> usr/lib32
├── lib64 -> usr/lib64
├── libx32 -> usr/libx32
├── lost+found
├── media
├── mnt
├── opt
├── proc
├── root
├── run
├── sbin -> usr/sbin
├── snap
├── srv
├── sys
├── tmp
├── usr
└── var

23 directories, 0 files
简直爽歪歪~~