Headscale is an open-source server that works like Tailscale’s control server. You can run it yourself instead of using Tailscale’s hosted service. This gives you full control over your VPN network without device limits or subscription fees. Here’s how to set it up and connect your devices.
What is Tailscale?#
Tailscale is a VPN built on WireGuard. It works like other mesh VPN tools such as Netmaker. Tailscale runs WireGuard in user space, while Netmaker uses kernel-space WireGuard. This means Tailscale has slightly lower performance than kernel-space solutions. But it’s still much faster than OpenVPN and easier to use.
Here’s what makes Tailscale useful:
- Simple setup:
- No firewall configuration needed.
- Easy network setup.
- Security:
- Automatic key rotation.
- End-to-end encryption by default.
- Access logs you can review.
- NAT traversal: Uses DERP (Detoured Encrypted Routing Protocol) over TCP when UDP doesn’t work. This helps connections work even behind difficult firewalls.
- Central control: Push access rules and settings to all devices from one place.
- Easy authentication: Works with Google, Microsoft, GitHub, and other login providers.
Tailscale is basically WireGuard made easier to use.
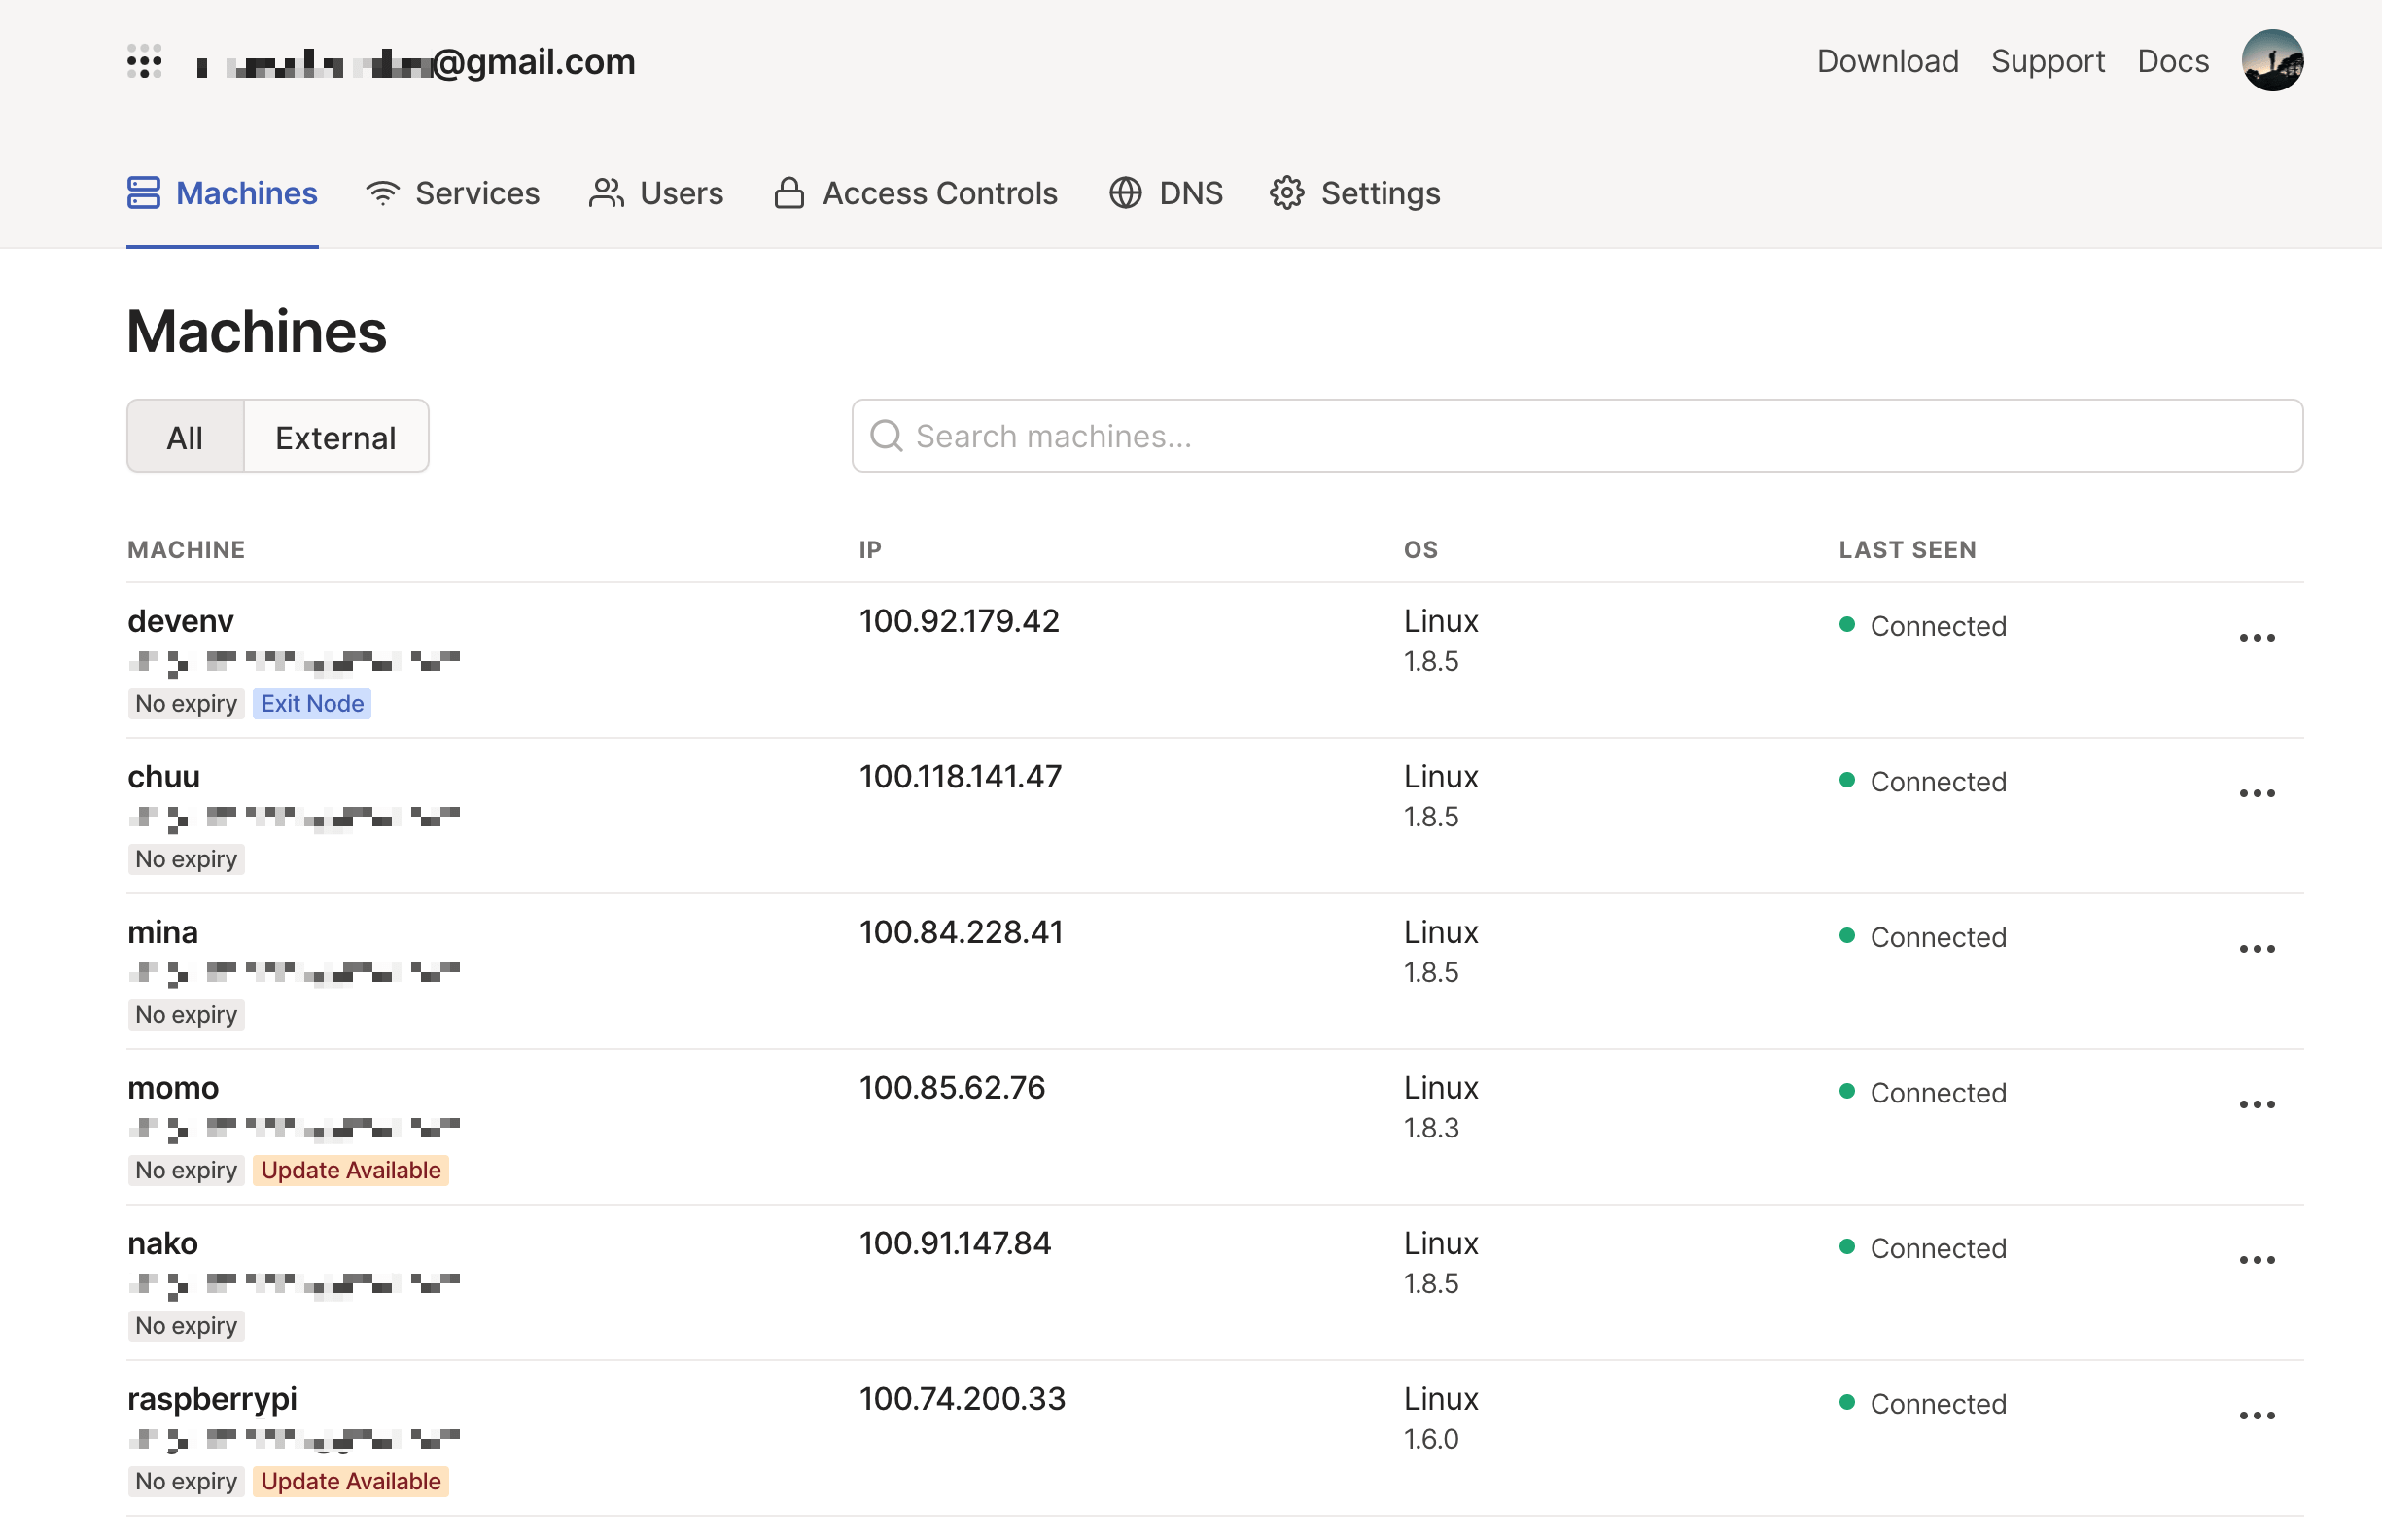
Tailscale has a free tier that works well for personal use or small teams. You can use it free as long as you stay under the device limit (around 20 devices per account - check their website for current limits). The free tier has some limits on advanced features like subnet routing, but it covers most basic needs. Most Tailscale client code is open source under the BSD license (except Windows and macOS GUI apps). You can find the source code in their GitHub repository.
The free tier works for most people. If you need more features, they have paid plans.
But what if you want full control, unlimited devices, and no subscription fees? That’s where Headscale comes in.
What is Headscale?#
Tailscale’s control server is proprietary and has limits for free users. That’s fair since it’s how they make money. But the open-source community built an alternative: Headscale. It’s become the main open-source option for self-hosted Tailscale setups.
Juan Font at the European Space Agency created Headscale. It’s written in Go and released under the BSD license. Headscale copies most of Tailscale’s control server features. You can run the whole coordination server yourself. This gives you full control over your network traffic and removes device limits. If you want to run your own secure VPN without restrictions, Headscale is a good choice.
How to Deploy Headscale#
Here are different ways to set up Headscale.
Quick Deploy with Sealos#
If you want to get started fast, the Sealos App Store has one-click Headscale deployment. This is simple and needs almost no setup.
Click one of these to deploy Headscale:
Click “Deploy on Sealos” to start. Sign in to your Sealos account, then click “Deploy Application.” When it’s done, click on the Headscale app’s “Details” to see how to access it.

Your Headscale service will have a public domain that maps to internal port 8080.

Click on the public address to access your Headscale dashboard. This usually opens Headplane, a web interface for managing Headscale.

Deploy on a Linux Server#
Setting up Headscale manually on Linux is pretty simple.
Tip: Headscale only needs internet access to work. But for best NAT traversal performance, use a cloud server with a public IP address. This avoids extra NAT layers and gives your Tailscale clients better connectivity.
First, download the latest Headscale binary from the GitHub releases page.
# Replace <HEADSCALE_VERSION> and <ARCH> with your version and architecture (e.g., v0.22.3, amd64)
$ wget --output-document=/usr/local/bin/headscale \
   https://github.com/juanfont/headscale/releases/download/v<HEADSCALE_VERSION>/headscale_<HEADSCALE_VERSION>_linux_<ARCH>

$ chmod +x /usr/local/bin/headscale
Create the config directory:
$ mkdir -p /etc/headscale
Create a directory for data storage (SQLite DB and SSL certificates):
$ mkdir -p /var/lib/headscale
Create an empty SQLite database file:
$ touch /var/lib/headscale/db.sqlite
Download the example config file:
$ wget https://github.com/juanfont/headscale/raw/main/config-example.yaml -O /etc/headscale/config.yaml
Now edit /etc/headscale/config.yaml:
- Set
server_urlto your public IP or domain (e.g.,http://<YOUR_PUBLIC_IP_OR_DOMAIN>:8080orhttps://<YOUR_PUBLIC_IP_OR_DOMAIN>).- Note: If using a domain in mainland China, make sure it has ICP filing. If not, just use your public IP address.
- For HTTPS, make sure your TLS certificates are set up correctly.
- If you don’t want MagicDNS initially, set
dns_config.magic_dnstofalse. - Enable randomized client ports for better NAT traversal by setting
randomize_client_porttotrue. - You can customize your private network IP ranges:
ip_prefixes:
  # - fd7a:115c:a1e0::/48  # IPv6 prefix for your network
  - 100.64.0.0/10        # Default address space used by Tailscale/Headscale
Create a SystemD service file so Headscale runs automatically:
# /etc/systemd/system/headscale.service
[Unit]
Description=Headscale Controller - Self-hosted Tailscale coordination server
After=syslog.target
After=network.target

[Service]
Type=simple
User=headscale
Group=headscale
ExecStart=/usr/local/bin/headscale serve
Restart=always
RestartSec=5

# Security settings
NoNewPrivileges=yes
PrivateTmp=yes
ProtectSystem=strict
ProtectHome=yes
ReadWritePaths=/var/lib/headscale /var/run/headscale
AmbientCapabilities=CAP_NET_BIND_SERVICE

RuntimeDirectory=headscale

[Install]
WantedBy=multi-user.target
Create the headscale user:
$ useradd headscale -d /home/headscale -m -s /bin/false
Change ownership of the data directory:
$ chown -R headscale:headscale /var/lib/headscale
Update the unix_socket path in /etc/headscale/config.yaml:
unix_socket: /var/run/headscale/headscale.sock
Reload SystemD:
$ systemctl daemon-reload
Start Headscale and enable it to start at boot:
$ systemctl enable --now headscale
Check the service status:
$ systemctl status headscale
# Look for "active (running)"
Check what ports Headscale is listening on (usually 8080 for HTTP, 9090 for gRPC):
$ ss -tulnp | grep headscale
# Example output:
# tcp LISTEN 0 1024 *:8080 *:* users:(("headscale",pid=...,fd=...))
# tcp LISTEN 0 1024 *:9090 *:* users:(("headscale",pid=...,fd=...))
Managing Users in Headscale#
Tailscale uses “tailnets” - separate network groups that don’t talk to each other. You can read more about this in Tailscale’s docs: What is a tailnet?. In Headscale, these are called “users.” You need to create at least one user before connecting devices to your network.
Create Users via Command Line#
To create a user named default:
$ headscale users create default
# Expected output: "User created"
To see your users:
$ headscale users list
# Example output:
# ID | Name | Username | Email | Created
# 1  |      | default  |       | 2025-05-26 05:03:48
If you used Sealos to deploy Headscale, click the “Terminal” button on the Headscale app details page to open a terminal:

Then run the commands above to create your user.
Create Users with Headplane#
Headplane is a web interface for managing Headscale. It needs an API key to connect to your Headscale server. First, generate an API key.
Run this command on your Headscale server (or in the Sealos terminal):
$ headscale apikeys create
# Copy the generated API key. Keep it safe like a password.
Enter the API key in Headplane’s settings page. After connecting, go to “Users” at the top, then click “Add a new user”:

Connect Tailscale Clients to Headscale#
Tailscale clients on all major platforms can connect to custom control servers like Headscale. Older iOS clients worked a bit differently, but modern versions are simpler.
| OS | Works with Headscale | Notes |
|---|---|---|
| Linux | Yes | CLI and GUI clients. Good for relay nodes. |
| OpenBSD | Yes | CLI client. |
| FreeBSD | Yes | CLI client. |
| macOS | Yes | GUI and CLI. See macOS docs. |
| Windows | Yes | GUI interface. See Windows docs. |
| Android | Yes | GUI interface. Server can be changed. |
| iOS | Yes | GUI interface. See iOS docs. |
Here’s how to set up Tailscale clients on different platforms.
Connect Linux Clients#
Tailscale has official packages for Linux distributions. But users in some regions (like China) might get slow downloads from official repos. Tailscale also offers static binaries you can download directly.
Download the static version:
# Replace 1.XX.Y with the latest version and amd64 with your architecture
$ wget https://pkgs.tailscale.com/stable/tailscale_1.XX.Y_amd64.tgz
Extract it:
$ tar zxvf tailscale_1.XX.Y_amd64.tgz
# Creates a directory like tailscale_1.XX.Y_amd64/ with the binaries
Install the binaries:
$ sudo cp tailscale_1.XX.Y_amd64/tailscaled /usr/sbin/tailscaled
$ sudo cp tailscale_1.XX.Y_amd64/tailscale /usr/bin/tailscale
Copy the systemd service files:
$ sudo cp tailscale_1.XX.Y_amd64/systemd/tailscaled.service /lib/systemd/system/tailscaled.service
$ sudo cp tailscale_1.XX.Y_amd64/systemd/tailscaled.defaults /etc/default/tailscaled
Start the service:
$ sudo systemctl enable --now tailscaled
Check that it’s running:
$ sudo systemctl status tailscaled
# Look for "active (running)"
Now connect your Linux client to Headscale:
# Replace <HEADSCALE_PUB_ENDPOINT> with your server's public IP or domain.
# Use the right protocol (http/https) and port from your config.yaml.
$ sudo tailscale up --login-server=http://<HEADSCALE_PUB_ENDPOINT>:8080 --accept-routes=true --accept-dns=false

# If you used Sealos deployment, HTTPS is usually set up already.
# Replace <SEALOS_HEADSCALE_DOMAIN> with your Sealos domain.
$ sudo tailscale up --login-server=https://<SEALOS_HEADSCALE_DOMAIN> --accept-routes=true --accept-dns=false
You can also get connection commands from Headplane’s “Machines” page, which fills in the server URL for you.

Use --accept-dns=false at first to stop Headscale’s MagicDNS from changing your system DNS settings. Only enable it if you need it and have set it up properly.
After running tailscale up, you’ll see a registration link:
To authenticate, visit:

	https://headscale-your-instance.example.com/register/nodekey_xxxxxxxxxxxxxxxxxxxxxxxxxx

Open this link in your browser. The page will show you a command to run on your Headscale server to register the device. Or you can use Headplane: copy the node key (the long string after /register/), go to “Machines” in Headplane, click “Add Device,” paste the key in the Machine Key field, pick an Owner (the Headscale user), and click “Confirm.”

After registration, you’ll see the device info in Headplane:

Back on your Linux machine, Tailscale sets up the network automatically. This includes a network interface (like tailscale0), routing tables, and iptables rules. To check the Tailscale routing table:
$ ip route show table 52
To check iptables rules for Tailscale (if you use iptables):
$ sudo iptables -S | grep tailscale
$ sudo iptables -S -t nat | grep tailscale
Set Up macOS Clients#
There are three ways to install Tailscale on macOS:
- App Store: Get the app from the Mac App Store.
- Direct download: Download the
.pkginstaller or.zipfile from Tailscale’s website. - Command line: Install the CLI tools. See the macOS documentation for details.
All three use the same networking code. They just differ in packaging and whether they have a GUI.
| Feature | App Store | Standalone App | Command Line |
|---|---|---|---|
| GUI | Yes | Yes | No |
| Background Running | No | Yes | Yes |
| Automatic Updates | Yes | Yes | Manual |
| Open Source | No | No | Yes |
| File Transfer | Yes | Yes | No |
After installing the Tailscale app, you need to configure it to use your Headscale server. Your Headscale server has setup instructions at https://<YOUR_HEADSCALE_PUBLIC_ENDPOINT>/apple.
For Tailscale versions 1.34.0 and later:
- Hold Option (⌥) and click the Tailscale icon in your menu bar.
- Hover over the Debug menu.
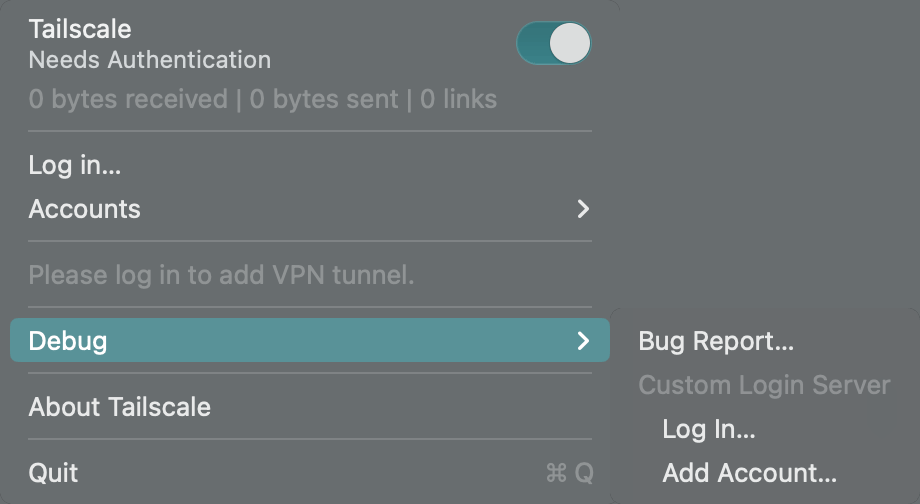
macOS Tailscale Debug menu - Select “Custom Login Server…” then “Add Account…” or “Change server…”.
- Enter your Headscale URL (e.g.,
https://<YOUR_HEADSCALE_DOMAIN>). Make sure to includehttp://orhttps://. Click “Add Account” or “Save.”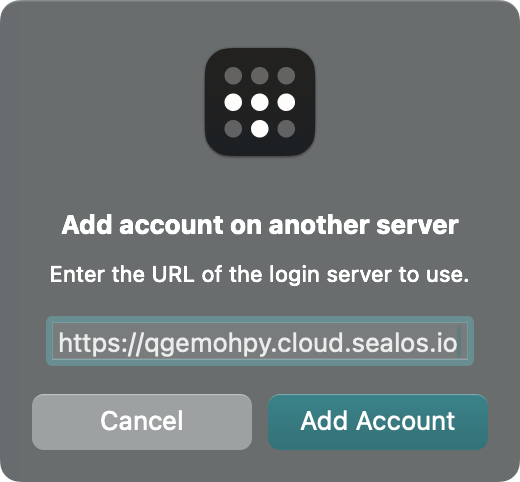
macOS Tailscale server configuration - Tailscale will connect to your Headscale server and open a registration page in your browser.
- Register the device the same way as Linux: copy the node key, go to “Machines” in Headplane, click “Add Device,” paste the key, pick an Owner, and click “Confirm.”

macOS registration success
Test connectivity by pinging another device in your network:
$ ping -c 2 100.64.0.1 # Ping another device's Tailscale IP
# Expected output:
# PING 100.64.0.1 (100.64.0.1): 56 data bytes
# 64 bytes from 100.64.0.1: icmp_seq=0 ttl=64 time=37.025 ms
You can also use the Tailscale CLI if available:
$ /Applications/Tailscale.app/Contents/MacOS/Tailscale ping 100.64.0.1
# Expected: pong from device-name (100.64.0.1) via ... in Xms
For older Tailscale versions (before 1.32.0), the setup might be different. Check your Headscale server’s /apple page for specific instructions.
Connect Android Clients#
Android Tailscale has supported custom servers like Headscale since version 1.30.0. Download it from Google Play or F-Droid.
Open the Tailscale app. You’ll see the login screen:
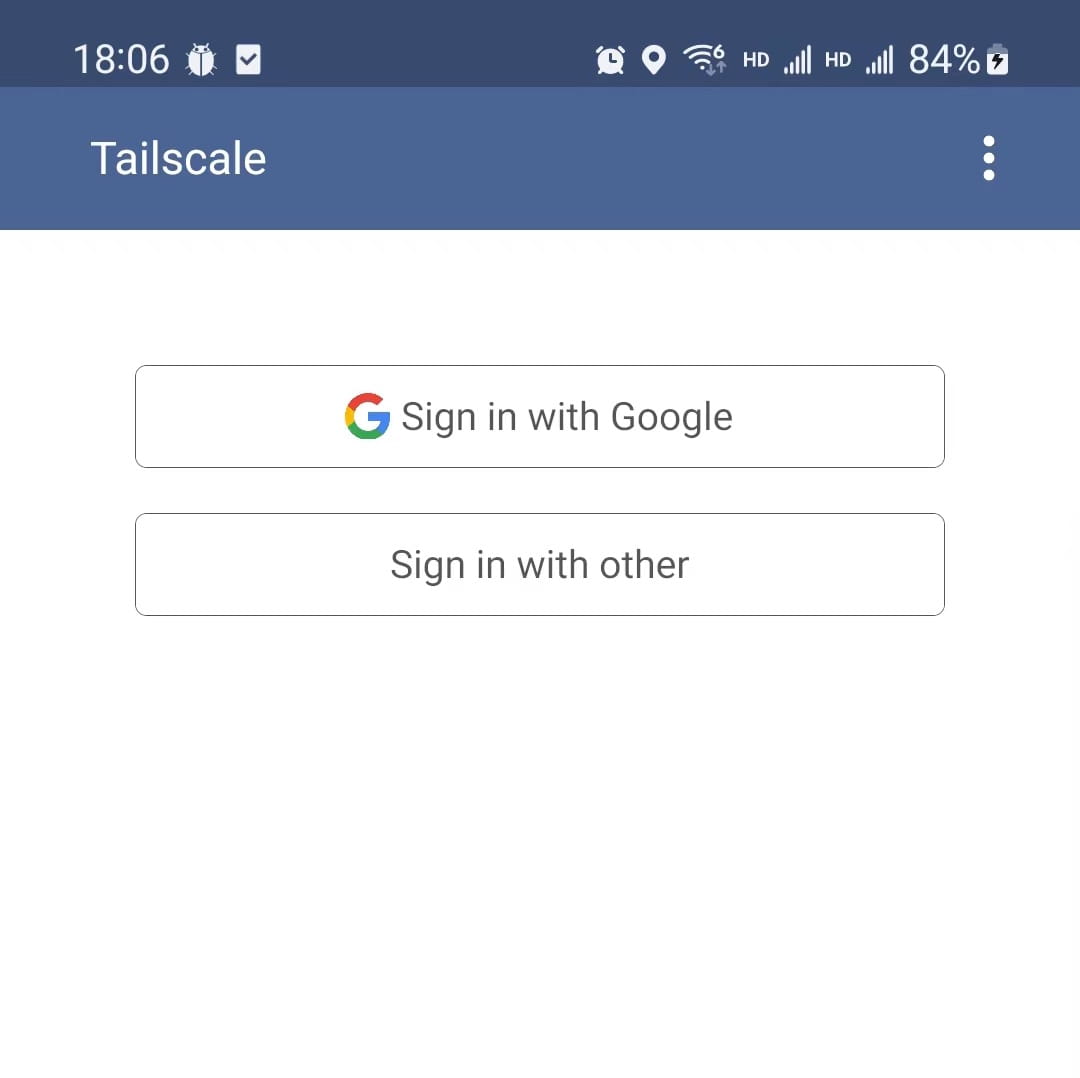
Tap the three-dot menu (⋮) in the top right. You’ll only see an About option at first:
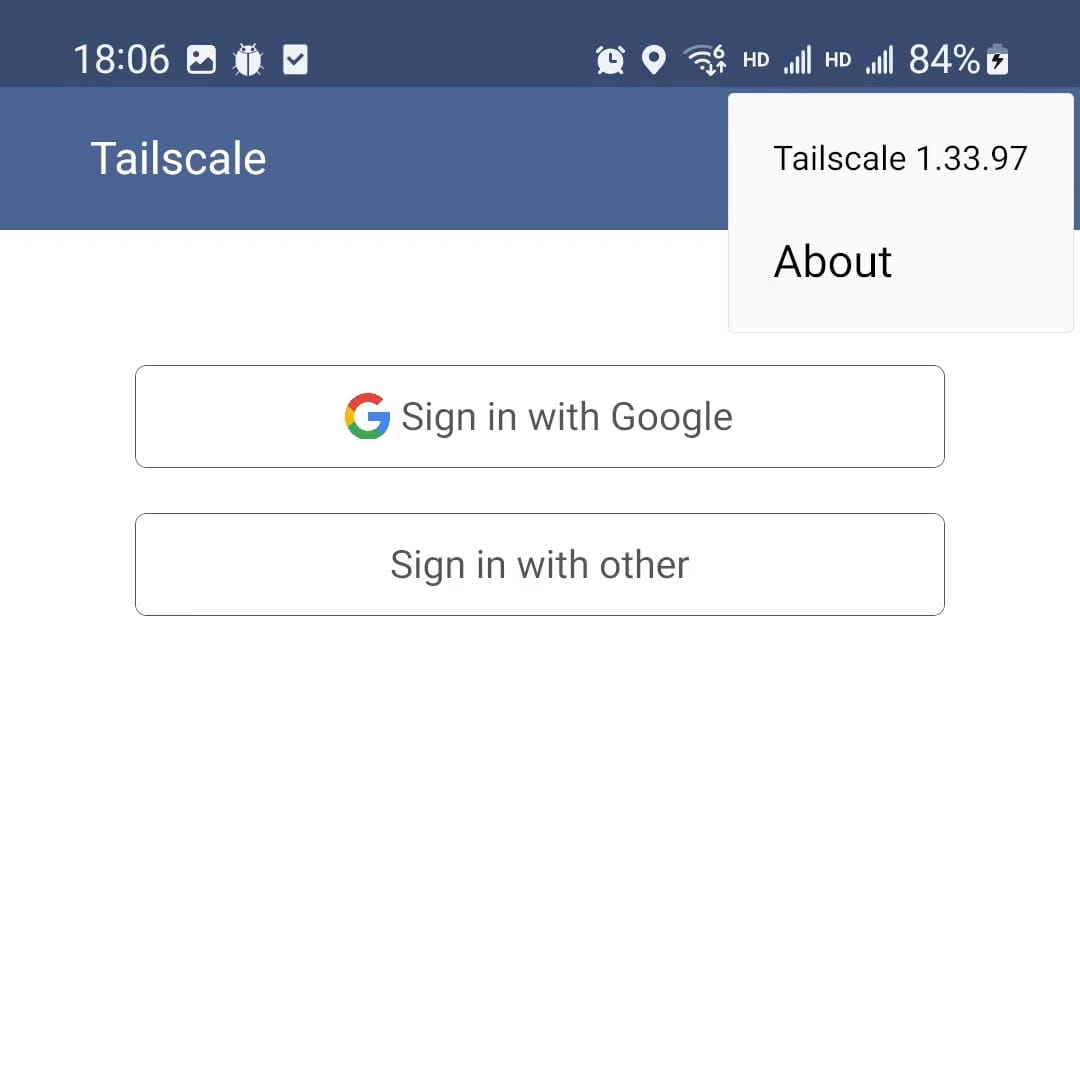
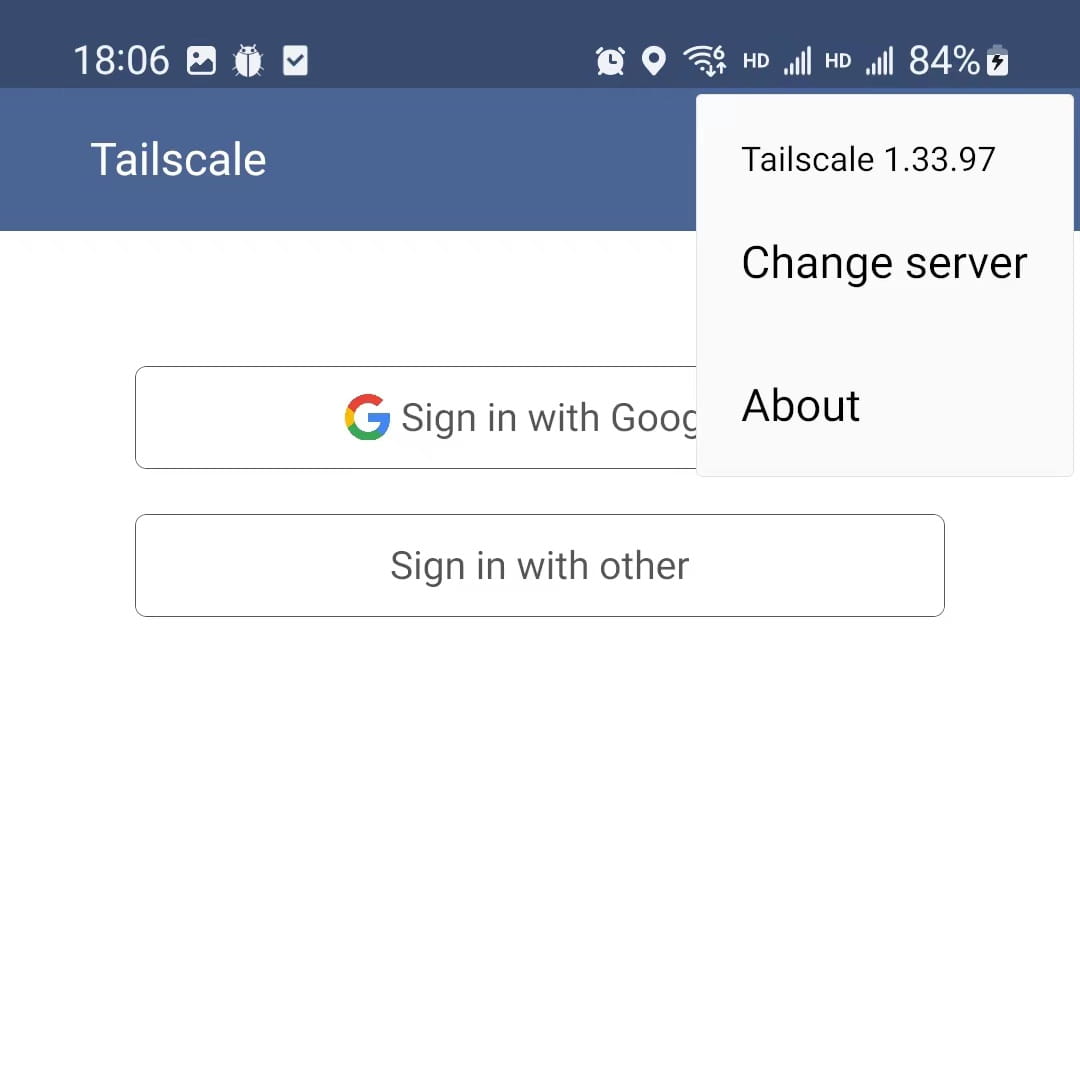
Here’s a trick to unlock the custom server option: quickly tap to open and close the three-dot menu about 5-7 times. A Change server option will appear:
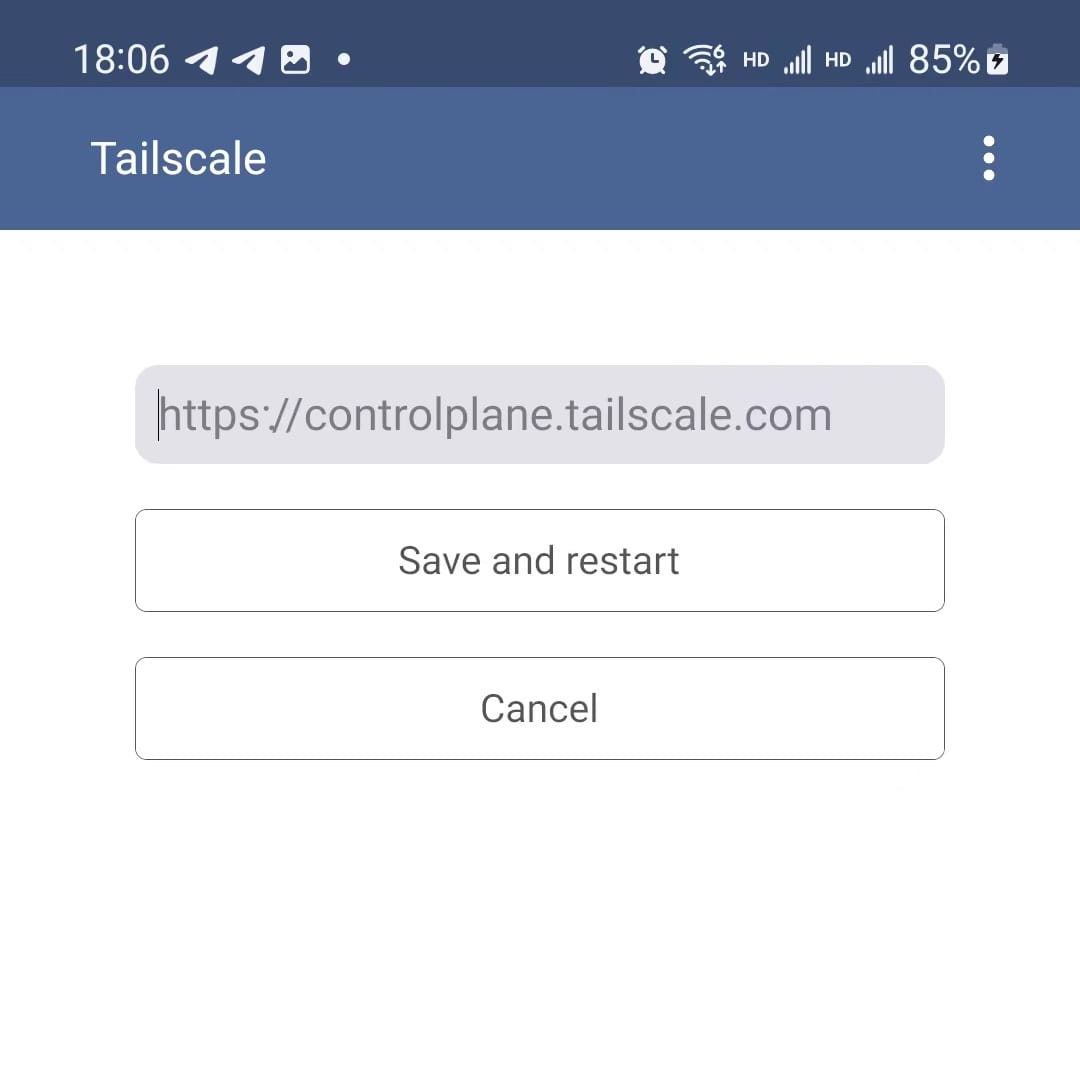
Tap Change server and enter your Headscale URL (e.g., https://<YOUR_HEADSCALE_DOMAIN>). Include http:// or https://:
Tap Save and restart. After restart, tap Sign in with other.... You’ll go to your browser for registration:
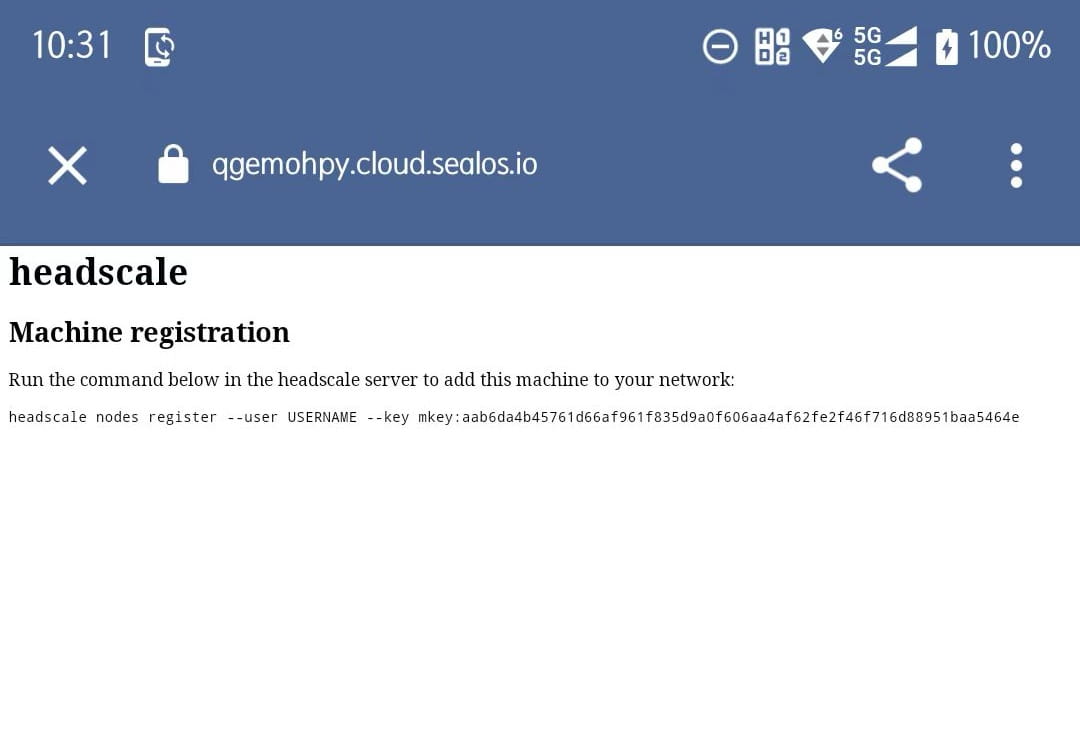
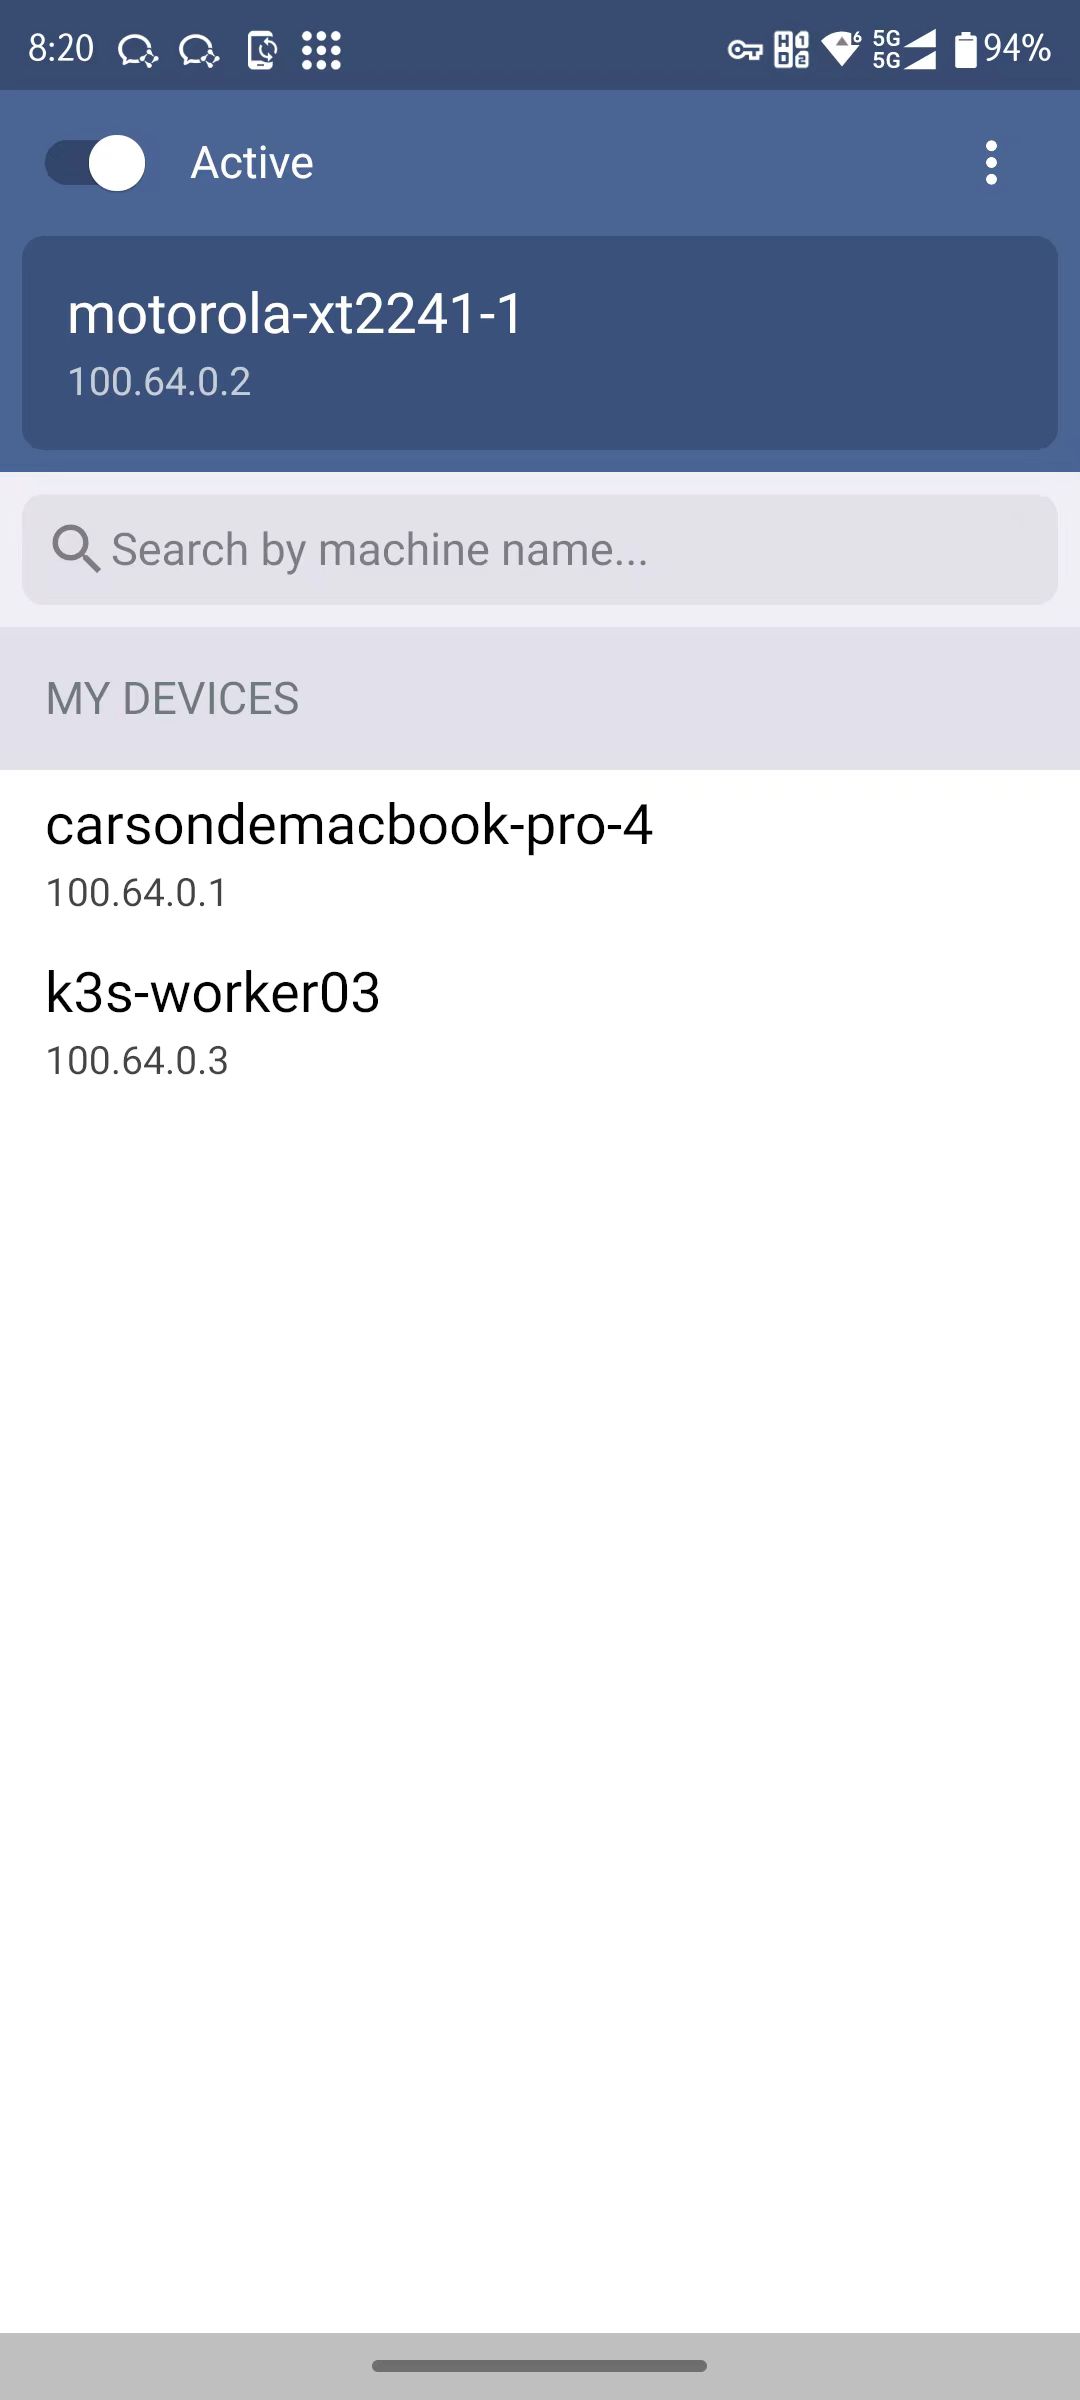
Copy the machine key from the page. Register it on your Headscale server or via Headplane like before. After registration, go back to the app - it should show as connected:
Connect Windows Clients#
To connect Windows Tailscale to Headscale, follow the instructions on your Headscale server’s Windows page. Open https://<HEADSCALE_PUB_ENDPOINT>/windows in your browser. This page shows you how to set it up, usually by editing the Windows Registry or using command-line parameters:
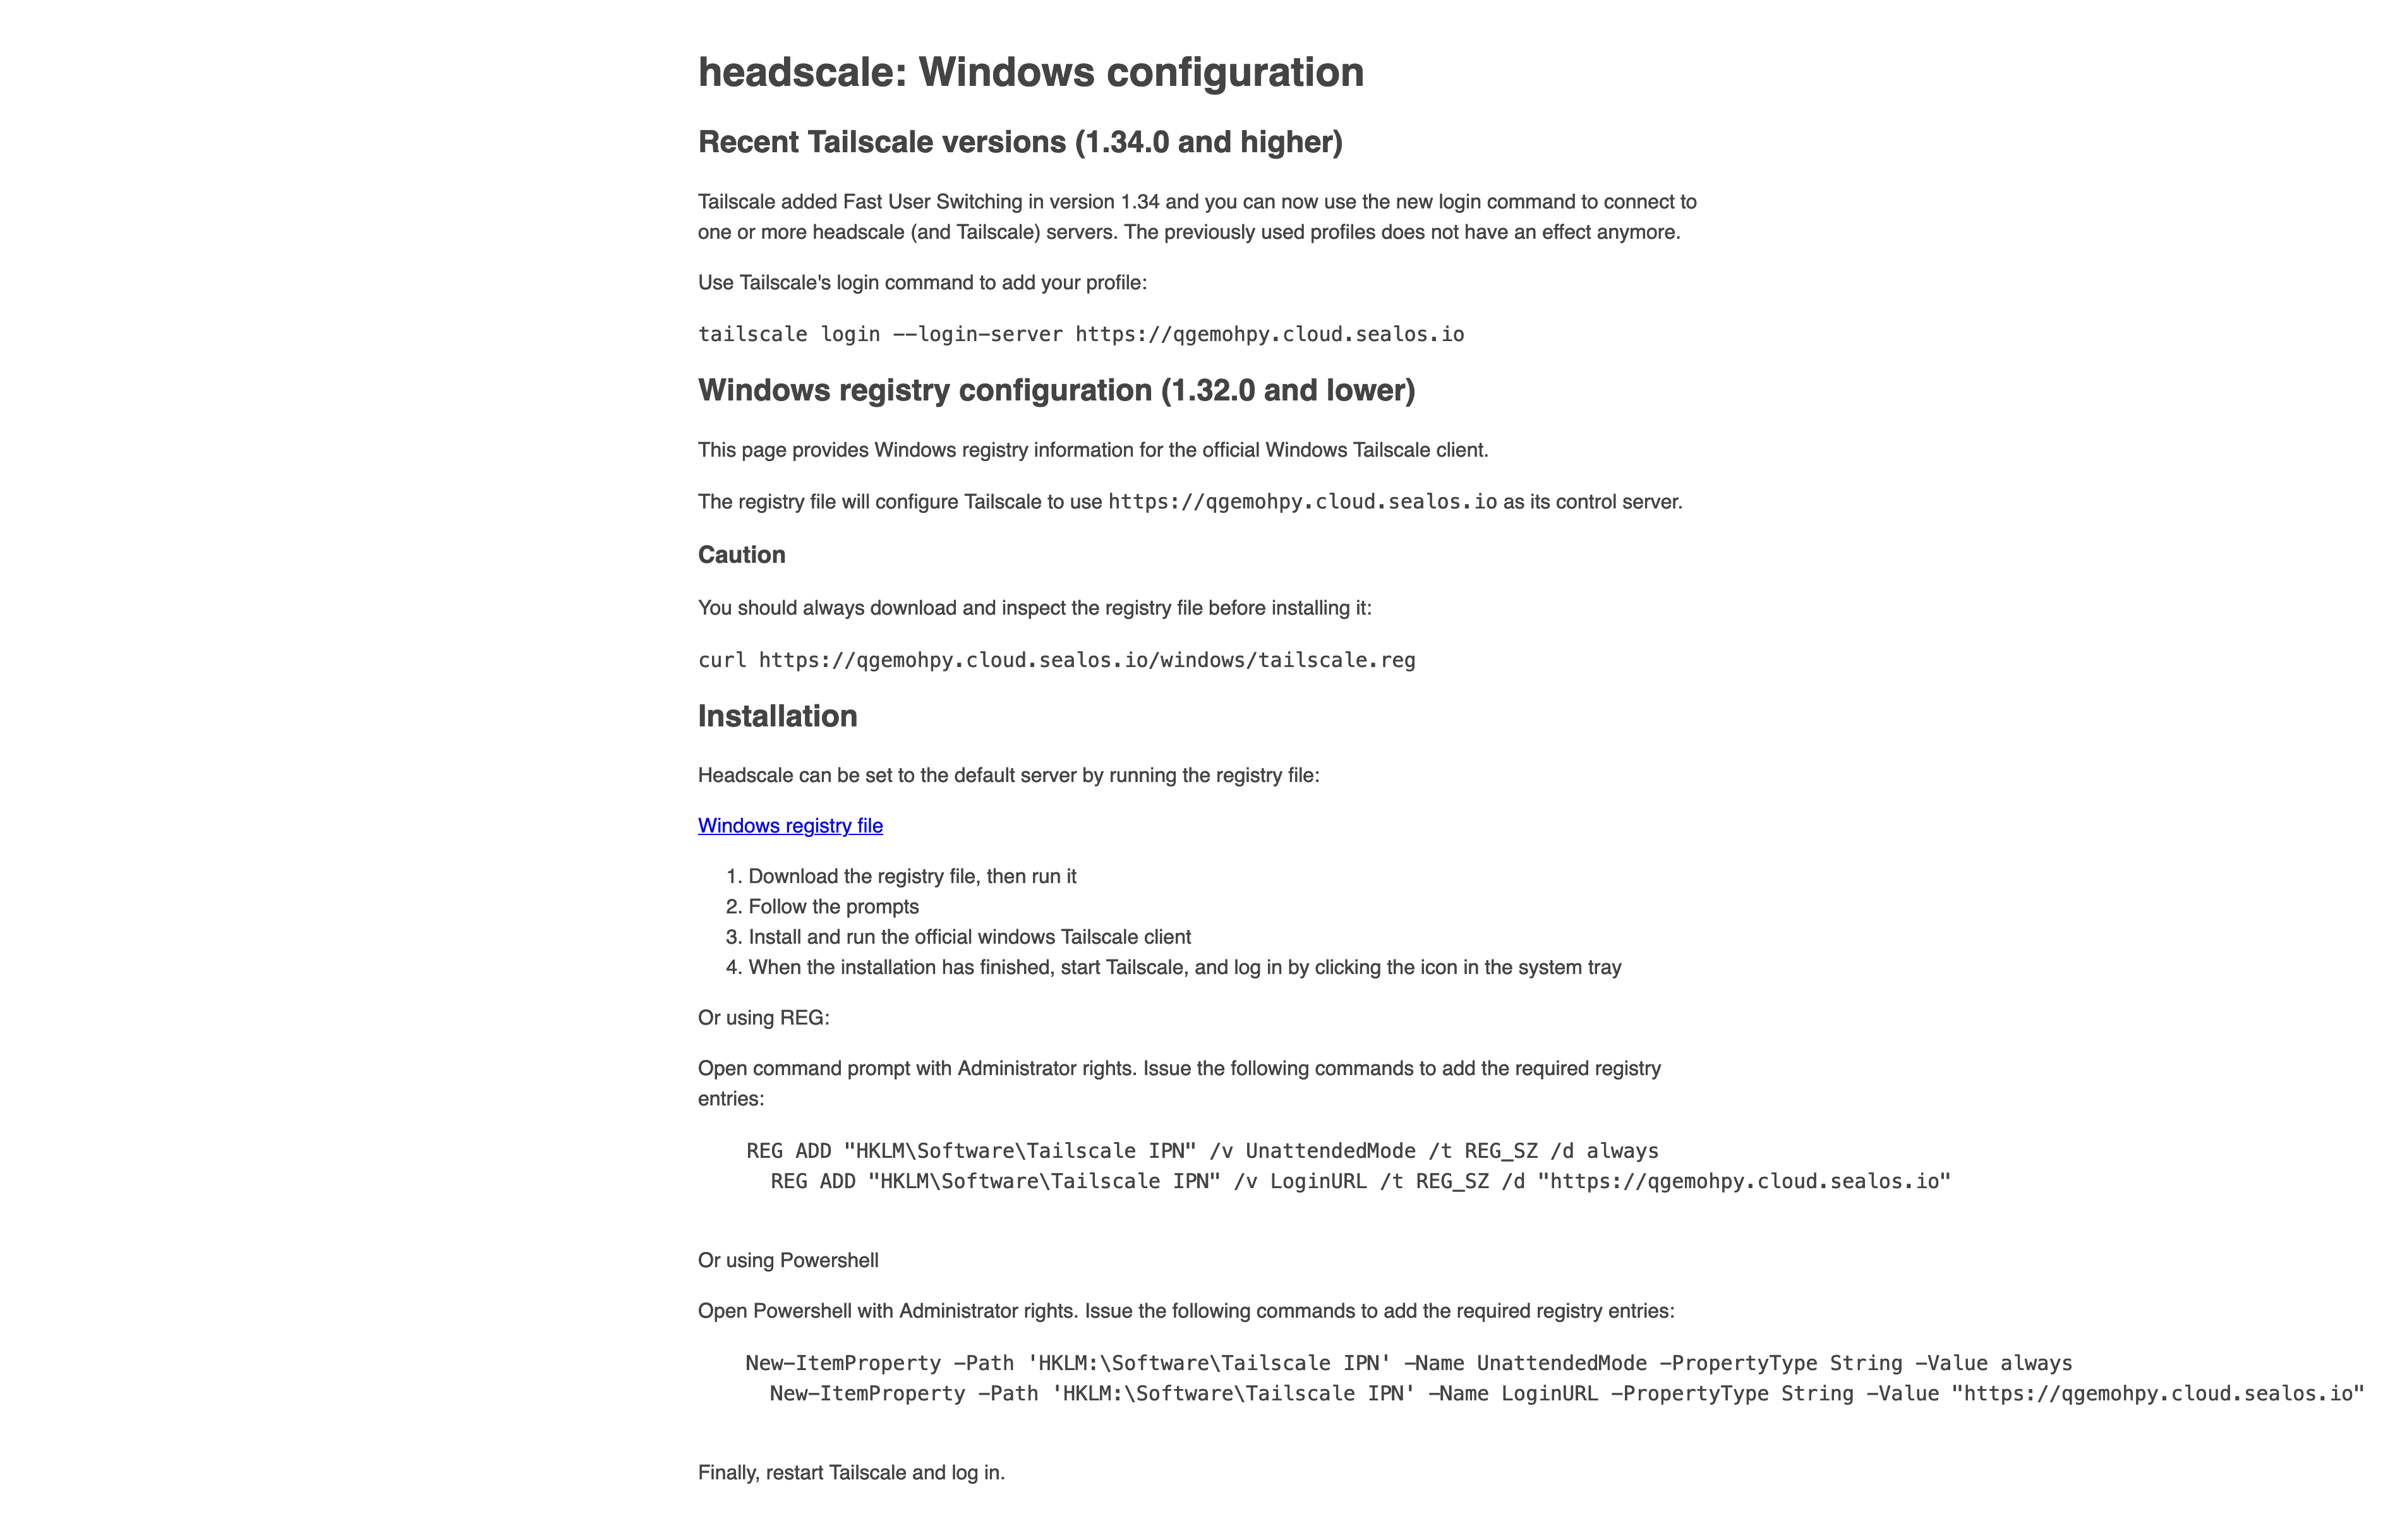
Follow the instructions carefully. You’ll usually edit registry entries to set the ControlURL or use parameters like /custom-server=<YOUR_HEADSCALE_URL> when installing or running Tailscale. After making changes, start the Tailscale client. It should open your browser for Headscale authentication, just like Linux and macOS.
Connect Other Linux Devices#
Many people run Linux on routers (OpenWrt) or NAS systems (QNAP, Synology). The community has made tools for installing Tailscale and connecting to Headscale on these devices:
- OpenWrt: Check out adyanth/openwrt-tailscale-enabler for scripts and packages.
- Synology NAS: Tailscale has official packages. See tailscale/tailscale-synology.
- QNAP NAS: Tailscale has official QNAP packages: tailscale/tailscale-qpkg.
Check the documentation in these repositories or your device’s forums for setup instructions. These devices work great as subnet routers.
Connect iOS Clients#
To use Tailscale on iPhone/iPad with Headscale, download the official app from the App Store. You might need an Apple ID from a region where Tailscale is available.
- Download the Tailscale iOS app.
- Open the app.
- Tap the account icon in the top-right, then “Log in…”.

iOS account screen - On the login screen, tap the options menu (three dots or gear) and choose “Use custom coordination server”.

Custom server option - Enter your Headscale URL (e.g.,
https://<YOUR_HEADSCALE_DOMAIN>) and tap “Log in”. You’ll go to your Headscale authentication page. - Register the device like before:
- Copy the machine key from the browser.
- Go to “Machines” in Headplane, click “Add Device,” paste the key, pick an Owner, and click “Confirm.”
- The iOS app will show the connection status and IP address.

iOS Tailscale connected
Auto-Register Devices with Pre-Auth Keys#
Headscale has “Pre-Authkeys” that let devices join automatically without manual approval each time. This is useful when adding many devices or automating setups.
Generate a pre-auth key for your user:
# Create a key for 'default' user that expires in 24 hours
$ headscale preauthkeys create --user default --expiration 24h
# Output includes: Key: xxxxxxxxxxxxxxxxxxxxxxxxxxxxxxxxxxxxxxxxxxxxxxxxxxxxxxxxxxxxxxxx
List your pre-auth keys:
$ headscale preauthkeys list --user default
# Shows: ID, Key, Reusable, Ephemeral, Used, Expiration, Created
You can also create keys in Headplane. Go to “Pre-auth keys” and click “Add a new Pre-auth key”:

Set the user, expiration time, and whether it’s reusable (multiple devices can use it) or single-use. Click “Confirm”:

View and manage your keys:

Now devices can join automatically using the --authkey parameter:
# Replace $AUTH_KEY with your actual key
# Replace <HEADSCALE_PUB_ENDPOINT> with your server address
$ sudo tailscale up --login-server=http://<HEADSCALE_PUB_ENDPOINT>:8080 --accept-routes=true --accept-dns=false --authkey=$AUTH_KEY
The device will register automatically under the user associated with the key.
Set Up Subnet Routing#
So far, we’ve built a mesh network where Tailscale devices talk directly using their Tailscale IPs (usually 100.x.x.x). But Headscale and Tailscale can do more. You can let any Tailscale device access an entire local network behind another Tailscale device. This subnet routing has many uses:
- Access your home NAS, printers, and smart devices from anywhere.
- Connect to internal work servers remotely.
- Advanced: Access Kubernetes pod and service IPs by making K8s nodes subnet routers.
Say you have a Linux machine on your home network (like an OpenWrt router, Raspberry Pi, or any Linux server) running Tailscale and connected to Headscale. You want other Tailscale clients (like your laptop when you’re away) to reach any device on your home network using their local IP addresses (like the 192.168.100.0/24 subnet).
Here’s how to set up subnet routing:
Enable IP forwarding on the router:
On the Linux machine that will route traffic (like your OpenWrt router), enable IP forwarding:# Enable IPv4 forwarding $ echo 'net.ipv4.ip_forward = 1' | sudo tee /etc/sysctl.d/ipforwarding.conf # Enable IPv6 forwarding if needed $ echo 'net.ipv6.conf.all.forwarding = 1' | sudo tee -a /etc/sysctl.d/ipforwarding.conf # Apply changes now $ sudo sysctl -p /etc/sysctl.d/ipforwarding.confAdvertise routes from the router:
Add--advertise-routes=192.168.100.0/24to tell Headscale this device can route traffic for that subnet. If Tailscale is already running, use--resetto apply the new config:# Replace <HEADSCALE_PUB_ENDPOINT> with your server address $ sudo tailscale up --login-server=http://<HEADSCALE_PUB_ENDPOINT>:8080 --accept-routes=true --accept-dns=false --advertise-routes=192.168.100.0/24 --resetFor multiple subnets, separate with commas:
--advertise-routes=192.168.100.0/24,10.0.0.0/8.Enable the routes on Headscale:
After a device advertises routes, you must enable them on the Headscale server before other clients can use them.Using Headplane:
Go to the router device’s details page, click “Machine Settings” → “Edit route settings”:
Route settings Find the advertised route (like
192.168.100.0/24) and toggle it to “Enabled”:
Enable route Using command line:
Find your router node’s ID:$ headscale nodes list | grep your-router-hostname # Example output: # ID | Hostname | ... # 6 | openwrt-router | ... # List routes for the node $ headscale routes list --node-id 6 # Example output: # Route | Enabled | Node # 192.168.100.0/24 | false | openwrt-routerEnable the route:
$ headscale routes enable --node-id 6 --route "192.168.100.0/24"
# Output: Route enabled
To enable all routes for a node at once:
$ headscale routes enable --node-id 6 -aAccept routes on client devices:
Make sure client devices that need subnet access use--accept-routes=true. If they’re already running without this, reconfigure them with--reset:# On a client that needs subnet access $ sudo tailscale up --login-server=http://<HEADSCALE_PUB_ENDPOINT>:8080 --accept-routes=true --accept-dns=false --resetCheck the routing table to confirm it’s working:
# On a Linux client
$ ip route show table 52 | grep "192.168.100.0/24"
# Expected output (gateway IP will be your router's Tailscale IP):
# 192.168.100.0/24 via <ROUTING_NODE_TAILSCALE_IP> dev tailscale0 scope link
With subnet routing set up, you can now access any device on your home network’s 192.168.100.0/24 subnet from any Tailscale client with --accept-routes enabled. Whether you’re at work, a coffee shop, or traveling, you can reach your home devices using their local IP addresses.
Summary#
Tailscale and Headscale work well for stability, ease of use, and NAT traversal. They beat many older or more complex VPN options. This comes from Tailscale’s work on user-space NAT traversal techniques, especially their DERP server network. They wrote a good article about this: How NAT traversal works.
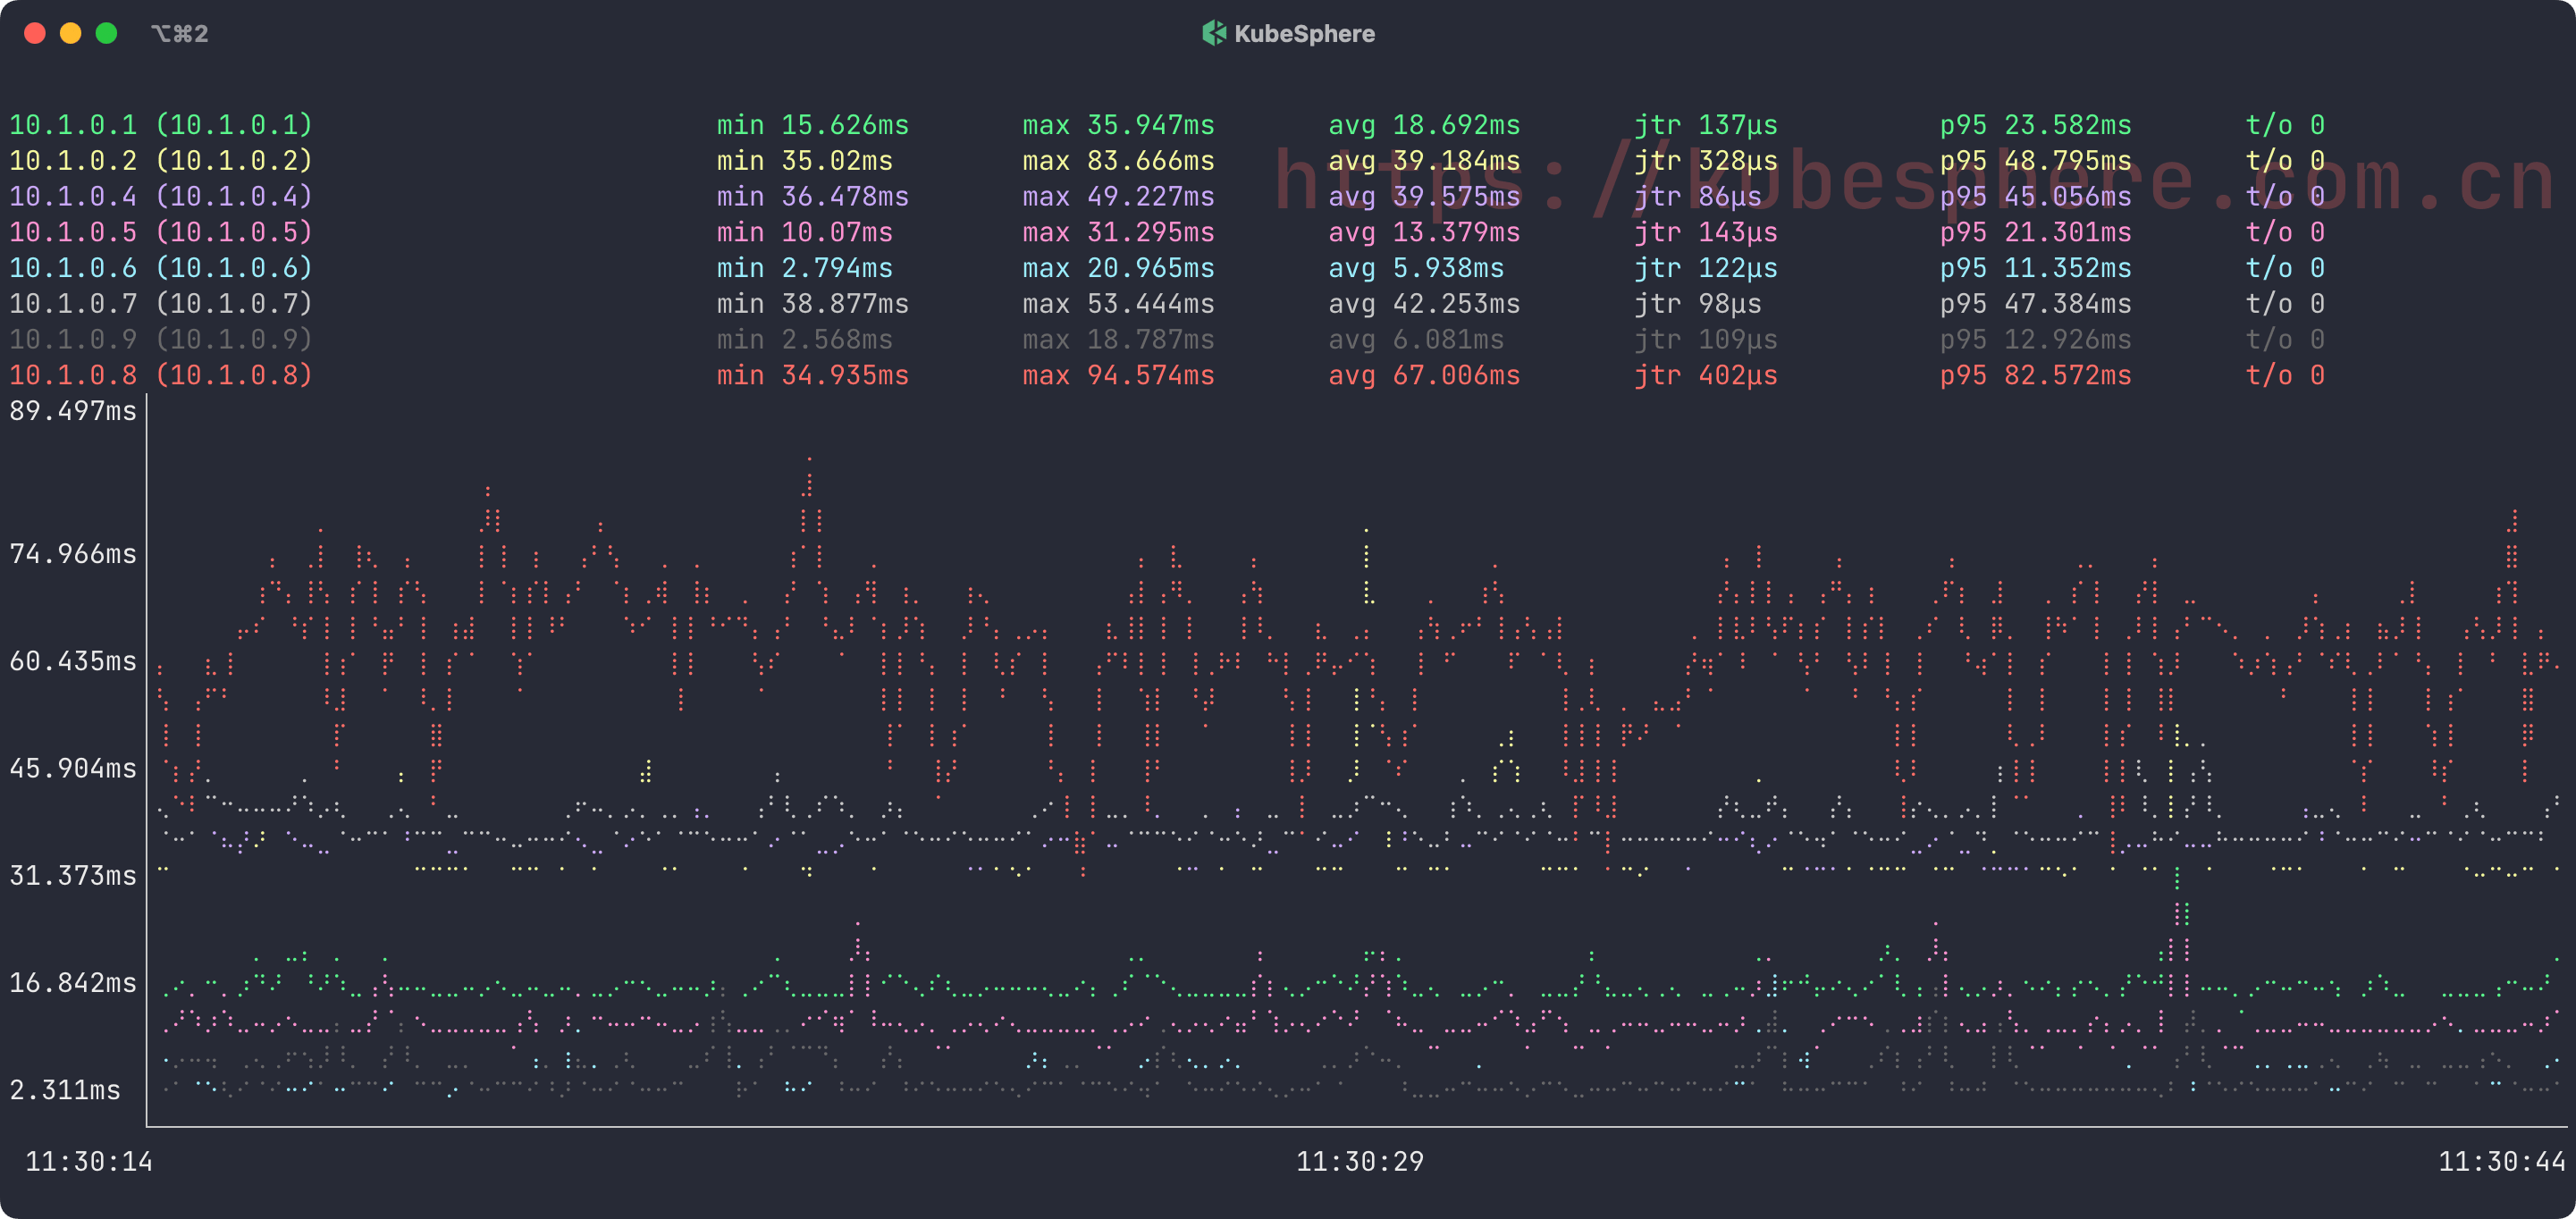
Here’s a simple diagram showing how Tailscale nodes connect, with help from a coordination server (Headscale) and DERP relays for difficult NAT situations:
This guide should help you build your own private, secure VPN with Headscale. You get full control over your network.
My next article will cover how to set up custom DERP servers with Headscale. This will improve connection quality, especially for devices behind difficult firewalls, and give you complete control over your VPN infrastructure.

